This article gives you an overview of the main workflows in SealPoint: reviewing your Dashboard, creating and sending quotes, scheduling jobs and tasks, managing your crew’s Work Load, completing jobs, and collecting payment.
Dashboard Overview
When you log in, you’ll land on the Dashboard. This gives you a quick overview of your business activity and upcoming work. From here, you can:
- Track Performance – Review completed jobs, payments captured and outstanding balances, and your quote approval percentage.
- Review Workload – See the number and quoted value of scheduled and unscheduled jobs for the selected timeframe.
- View Quote Requests – Quickly see new quote requests submitted by prospective or existing customers.
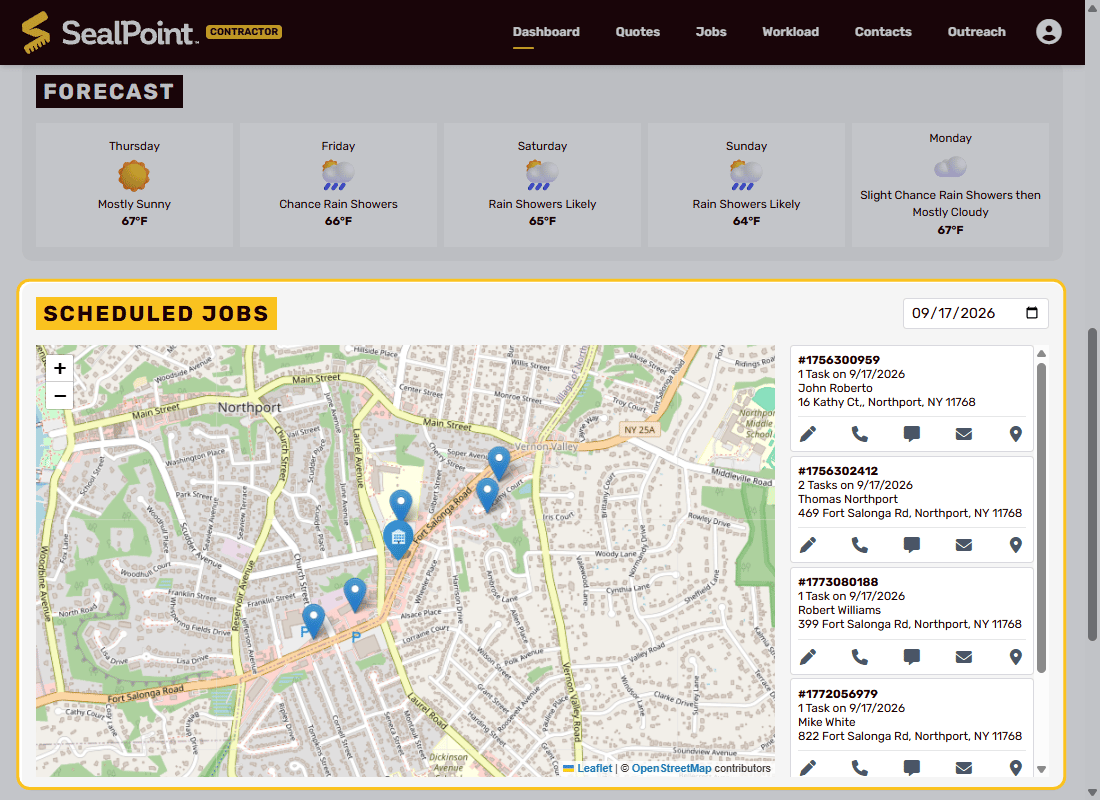
- Review Scheduled Jobs – See scheduled work for a selected day, including job locations plotted on a map and customer contact information.
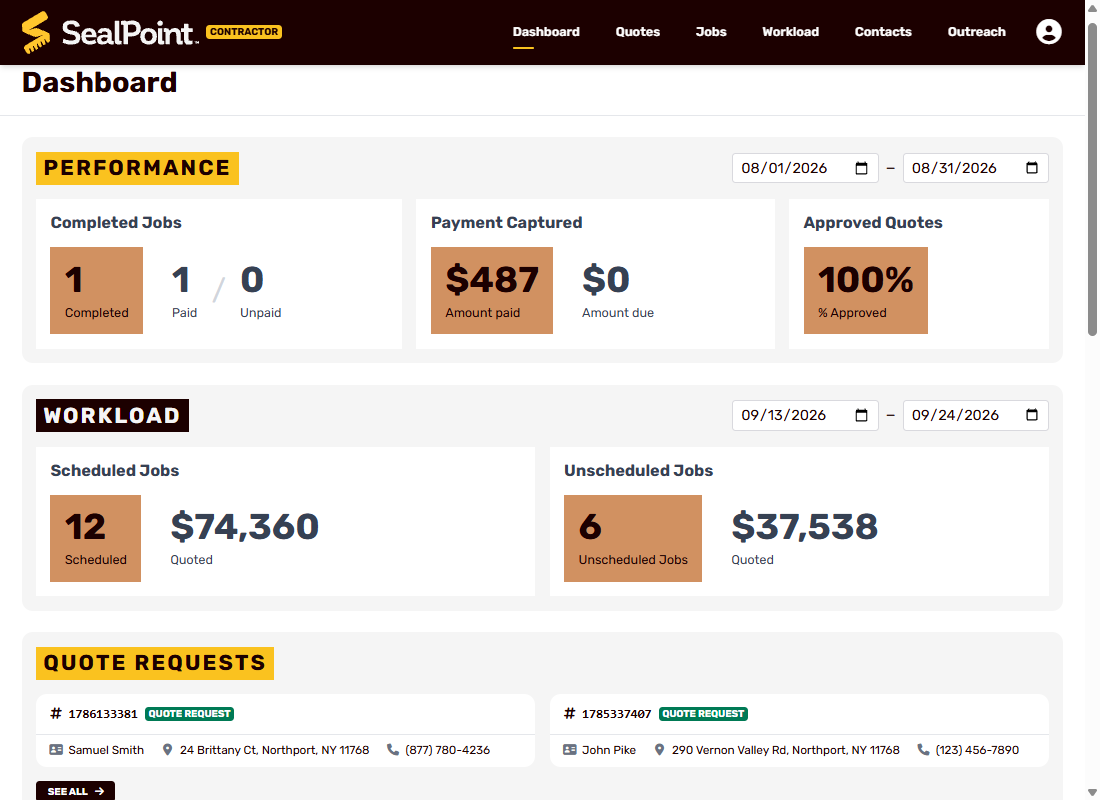
Use the date filters within the Performance and Workload sections to adjust the timeframe you want to review. Each section can be filtered independently, allowing you to look at recent business performance while also planning for upcoming work.
Quote Requests
The Quote Requests section gives you quick access to new requests submitted by customers through your organization’s Quote Request form. Each request displays the customer and service address information so you can quickly identify new opportunities that need attention.
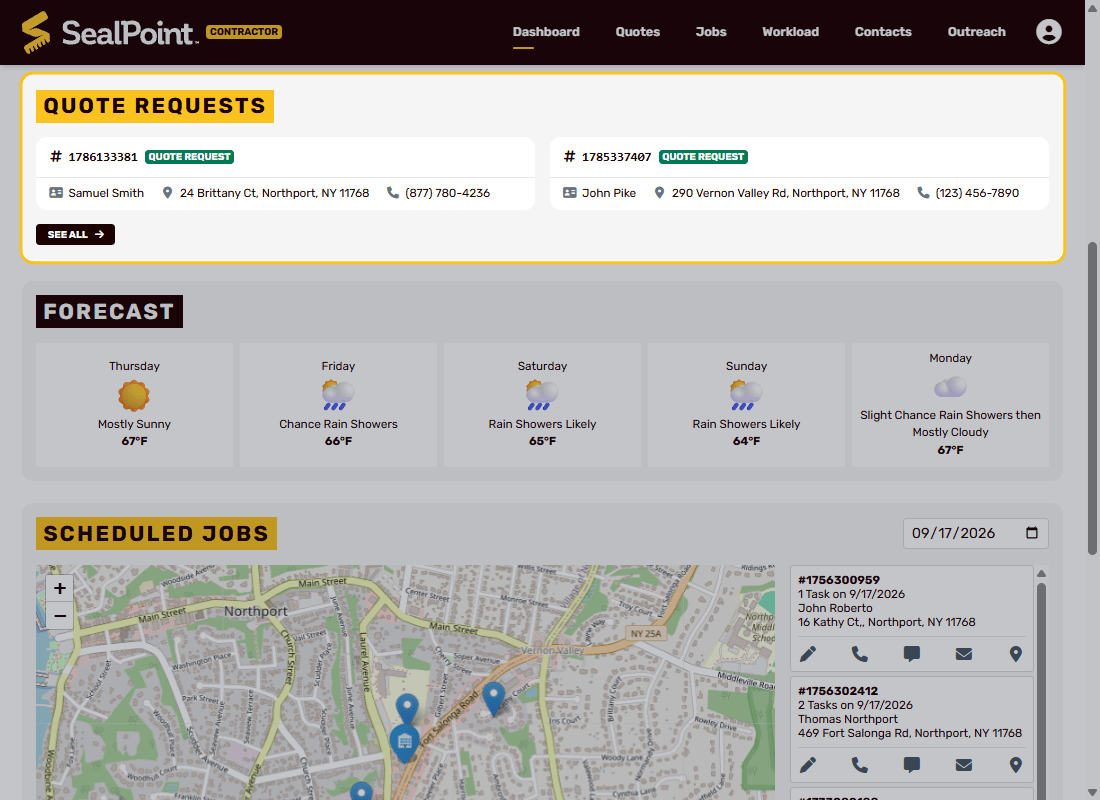
Select See All to review your complete list of quote requests and begin creating a quote.
For more information on setting up your Quote Request form and managing incoming requests, see the Custom Quote Request help article.
Scheduled Jobs
Further down the Dashboard, the Scheduled Jobs section displays work scheduled for the selected day. Each job location is plotted on a map, giving you a visual overview of where your crew will be working.
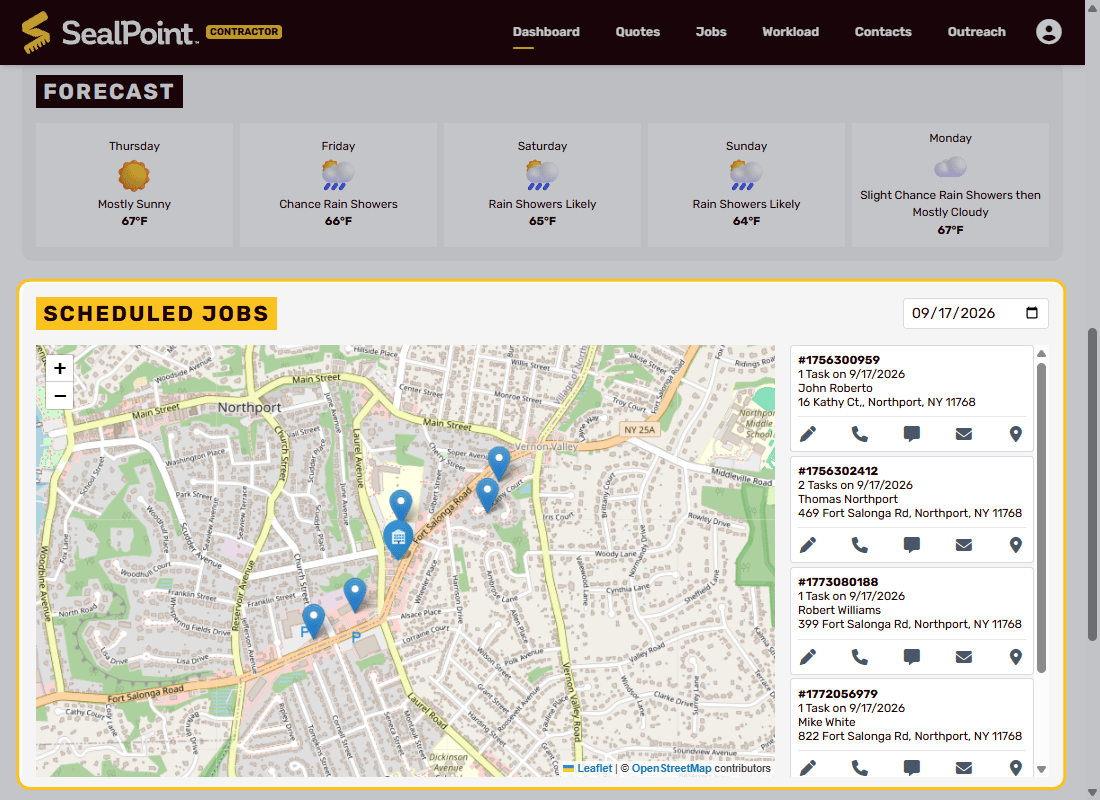 Alongside the map, customer contact cards provide quick access to job and contact information. Depending on your device, you can also call, text, or email the customer directly from their contact card.
Create & Send Quotes
Quotes are the starting point for every job in SealPoint. From a customer profile, you can quickly generate a quote using the built-in satellite measurement tool, add your service items with price, and send it out for approval. Once a quote is approved, you’ll be able to schedule and complete the job with just a few clicks.
First, from the top toolbar, go to Contacts → select or add a New Contact in the bottom right corner of the Contacts page.
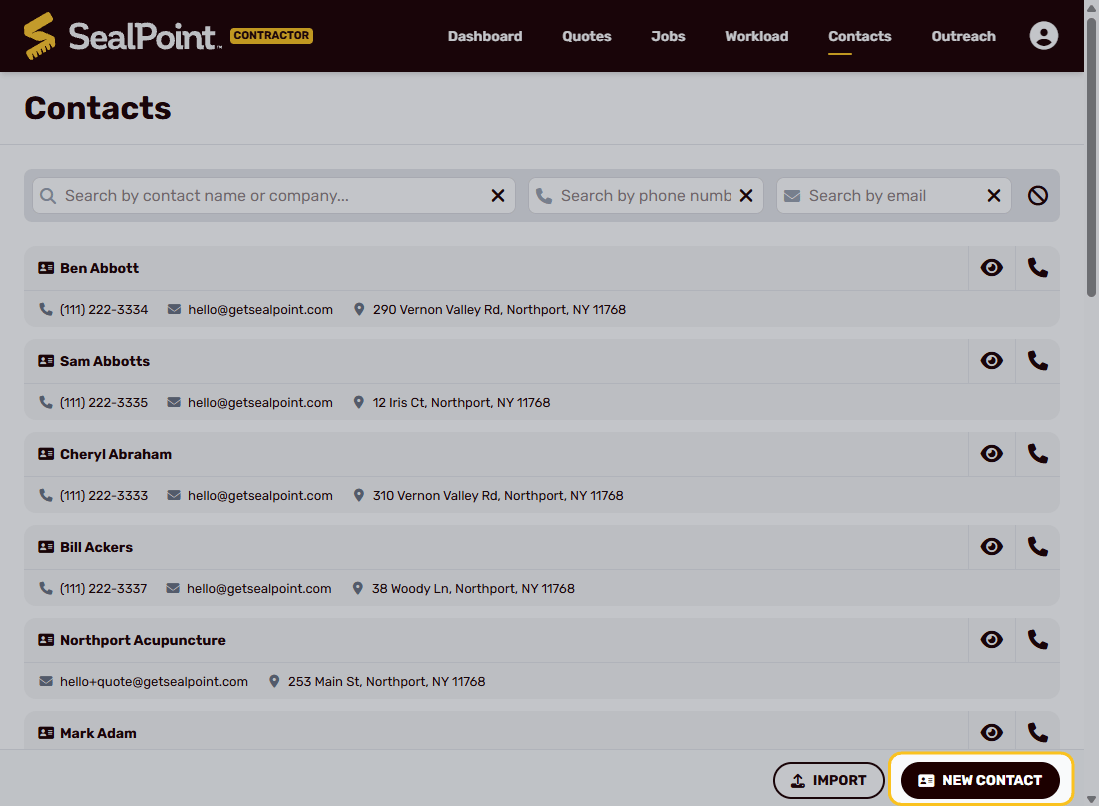
When adding or updating a customer’s contact information, take note of the Notification Preferences section.
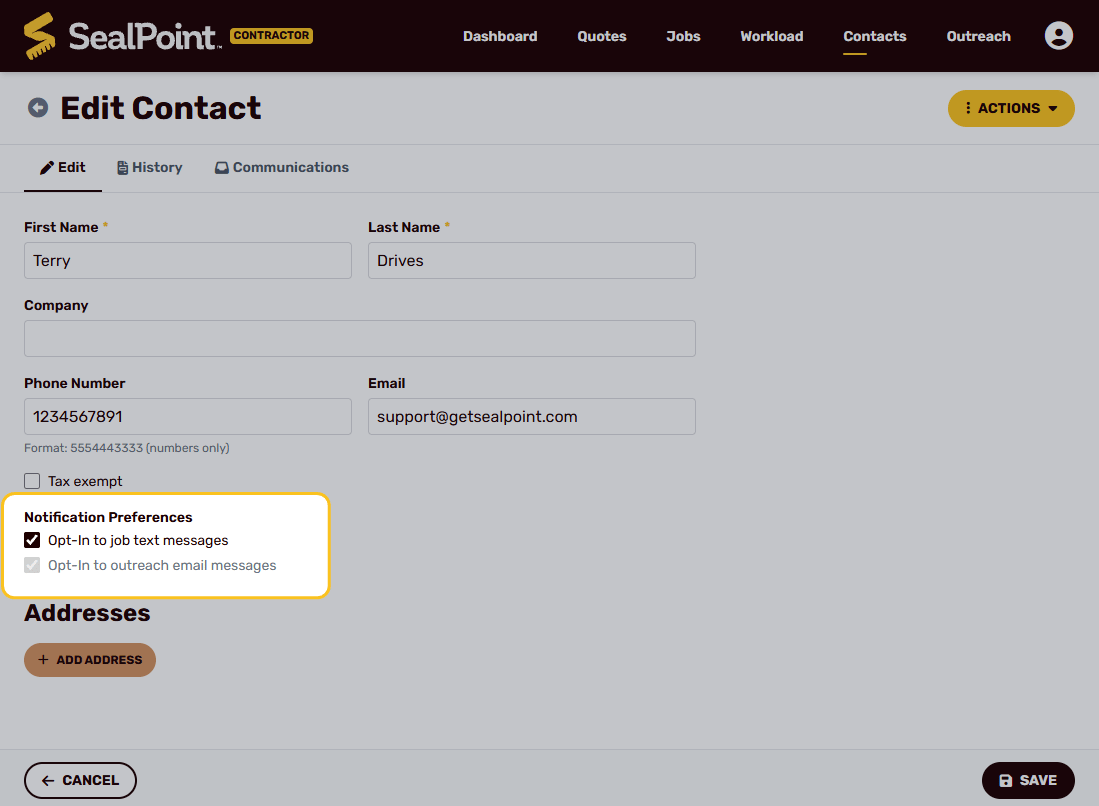
Notification Preferences determine which optional communications the customer receives. Transactional emails, such as quotes, job reminders, invoices, and receipts, are sent automatically and cannot be opted out of.
Customers can choose whether to Opt-In to job text messages and Opt-In to outreach email messages.
Note: If SMS job updates are enabled, the customer will first receive a confirmation text asking them to opt in to receive quote and job details by text message. Customers can opt out at any time by replying with STOP, END, or NO.
After the notification preferences are chosen, and the contact is created, select Add Address.
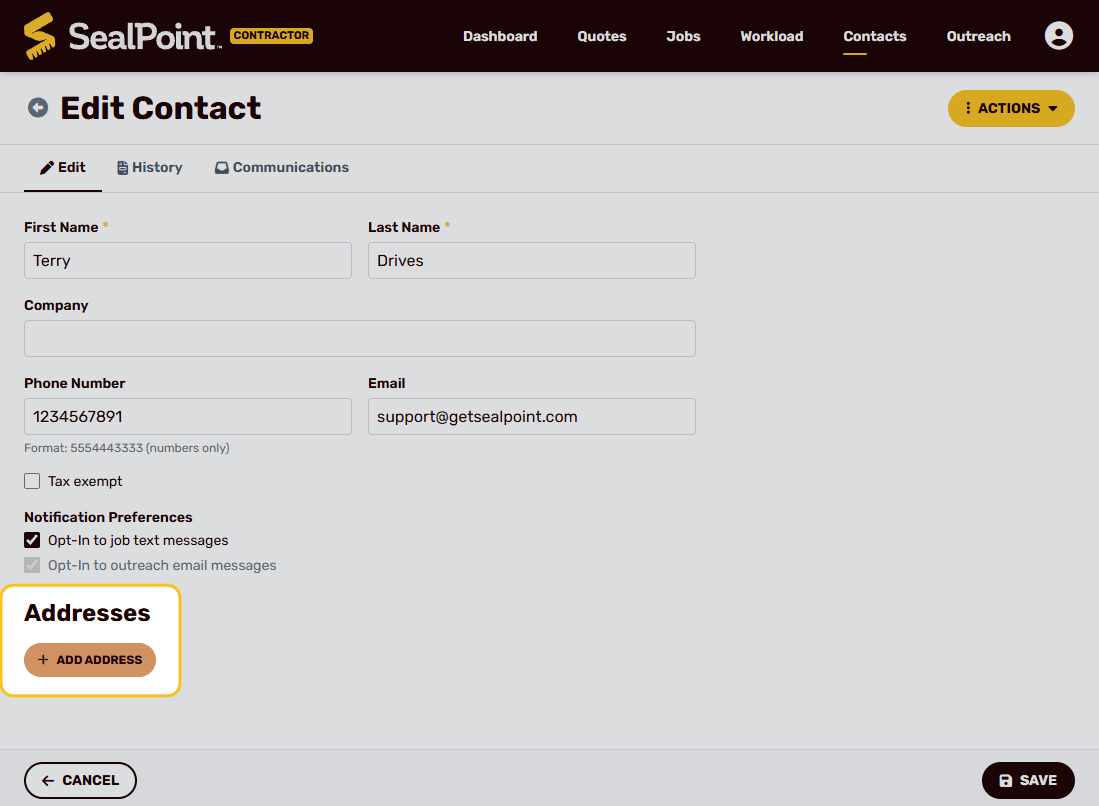
Enter the customer’s service address.
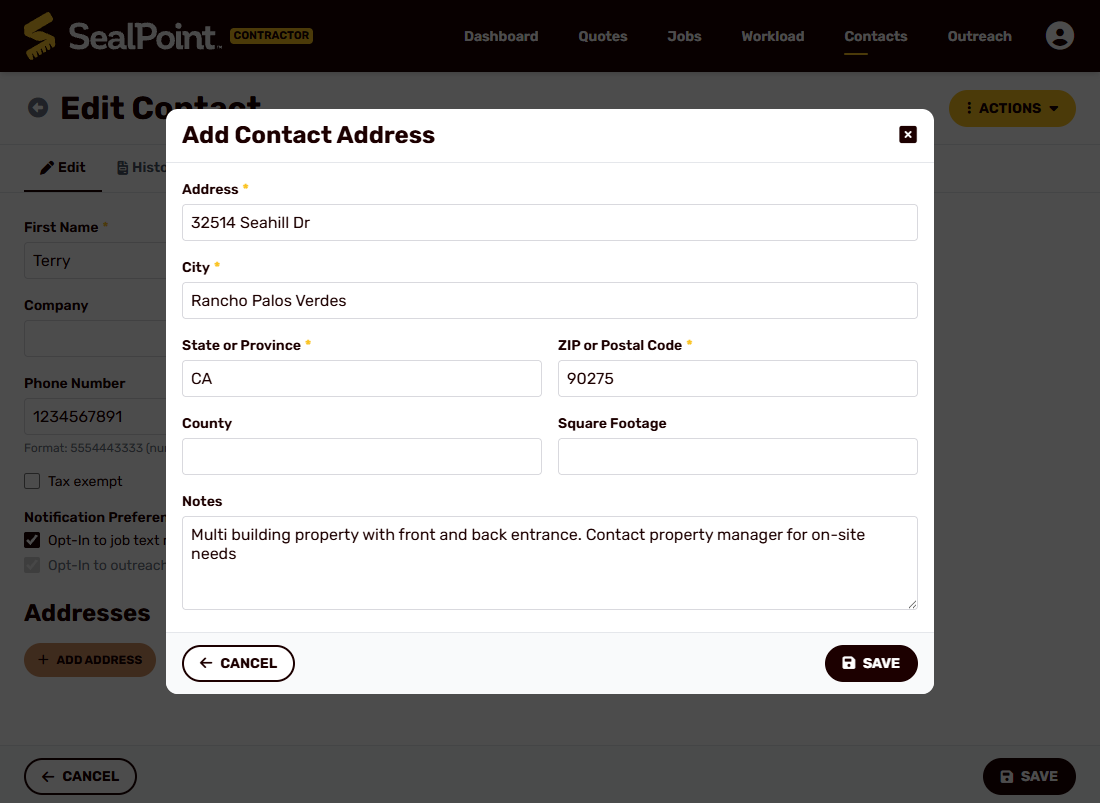
You can also include address-specific notes, which are visible only to users within your organization. It is not required to enter the square footage at this stage, but if it has already been calculated, you can add it for reference.
Now you're ready to create a quote, from the top toolbar go to Quotes → select New Quote. Select the customer you just created.
Start typing the customer’s name to quickly locate and select them from the list, then choose the correct service address. 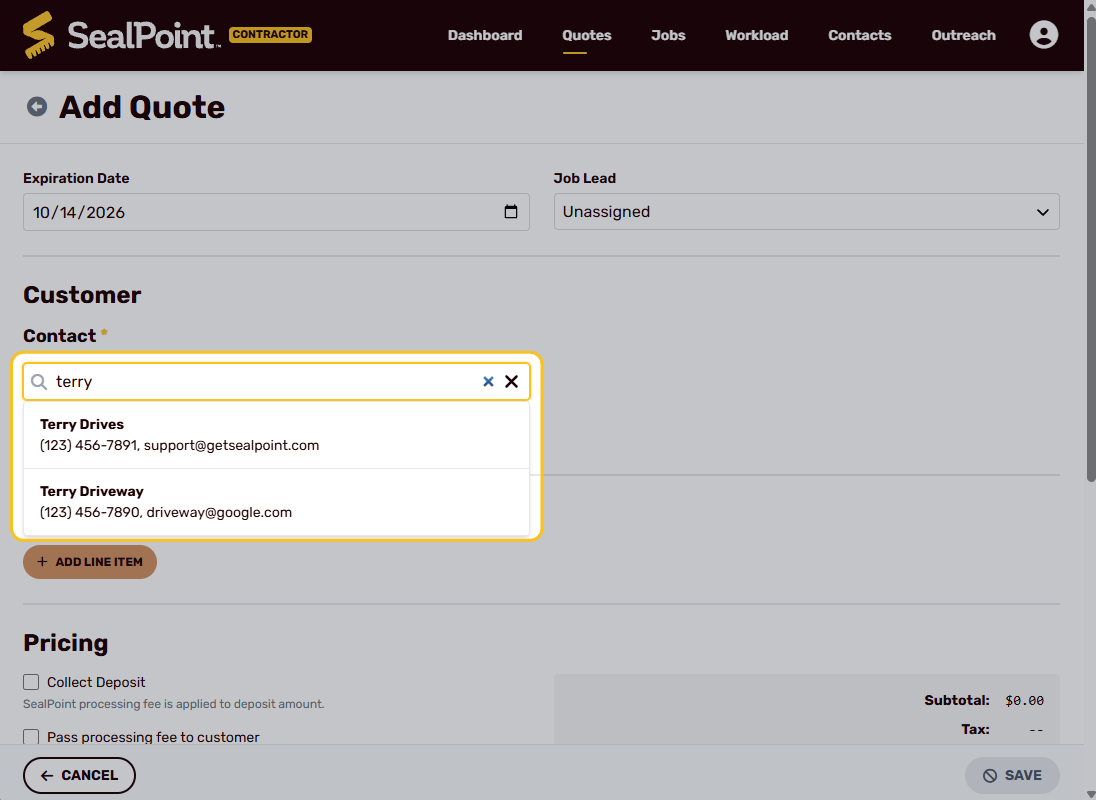
Once the service address is selected, a satellite image of the property will automatically load.
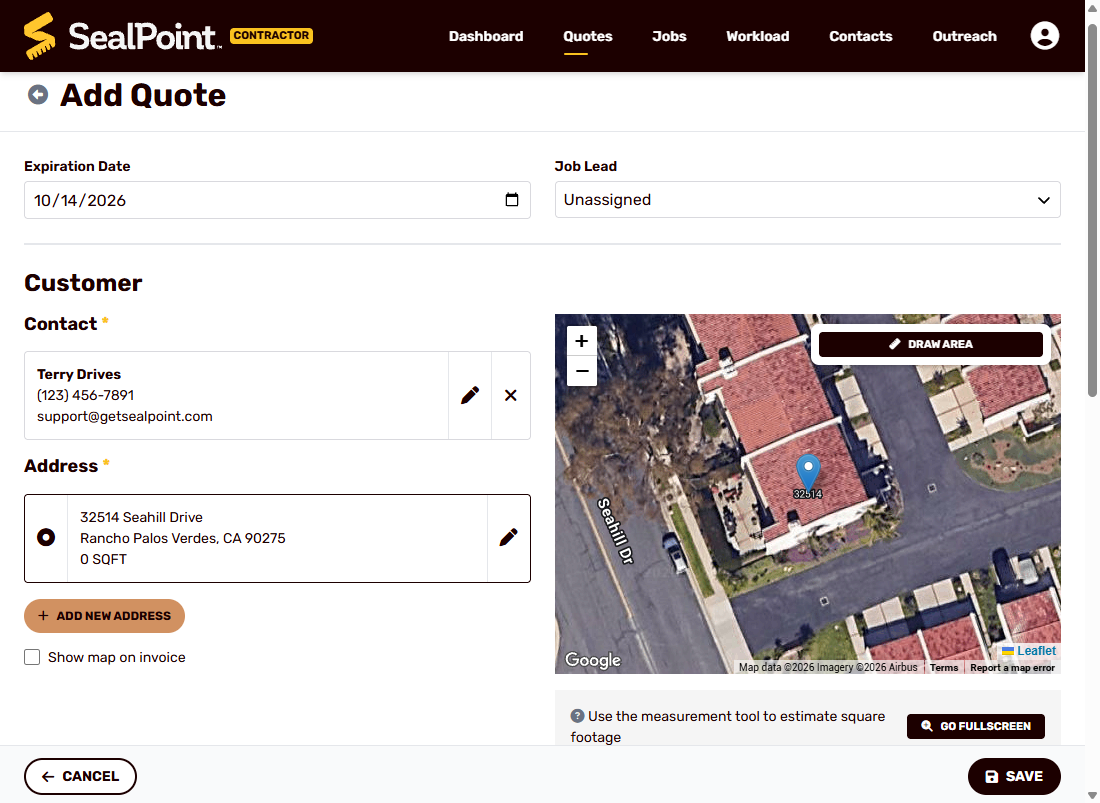
You can now use the built-in measuring tool to estimate the area’s square footage remotely, without needing to visit the property in person.
Select the Go Fullscreen option to enlarge the measuring tool.
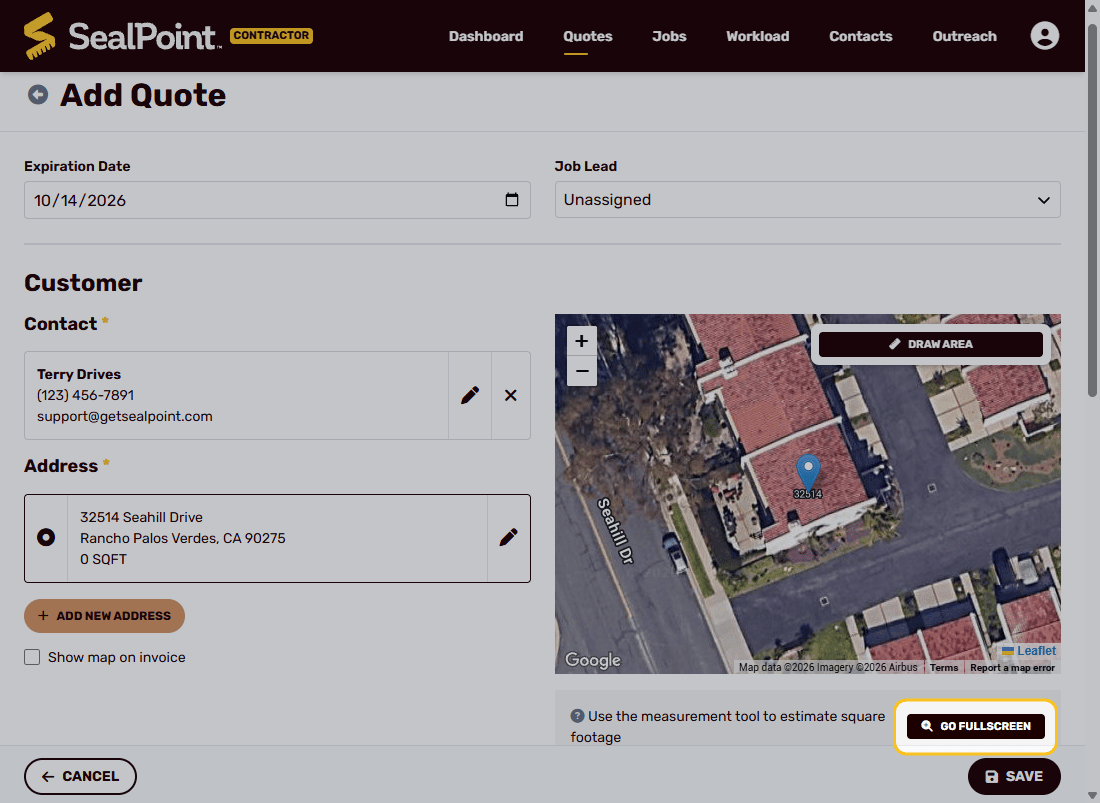
You do not need to use the fullscreen view to create a measurement. You can also measure the area directly from the smaller map window by selecting Draw Area.
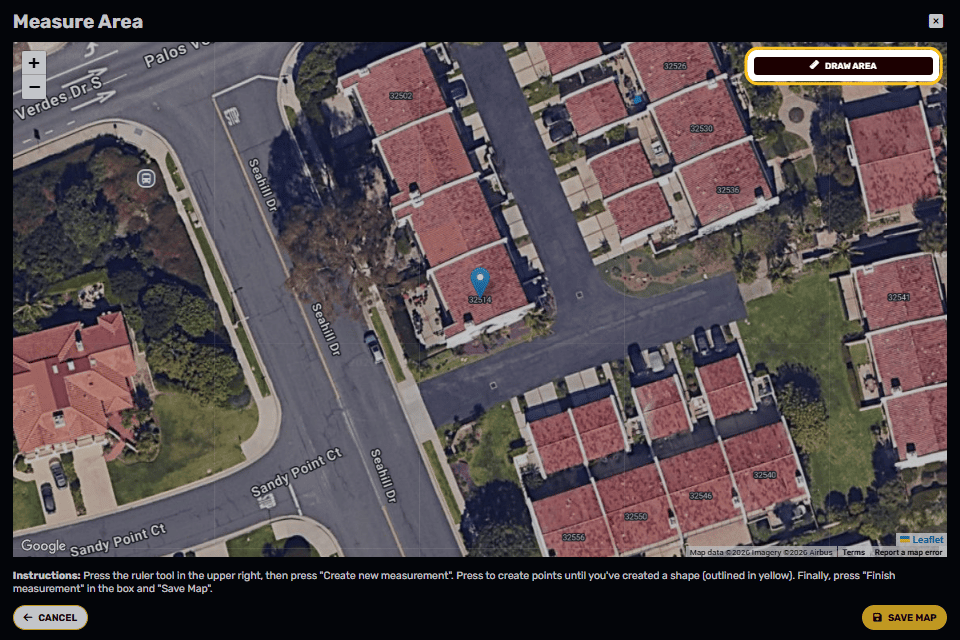
Outline the area to be measured by tapping the map to plot the points around the perimeter. 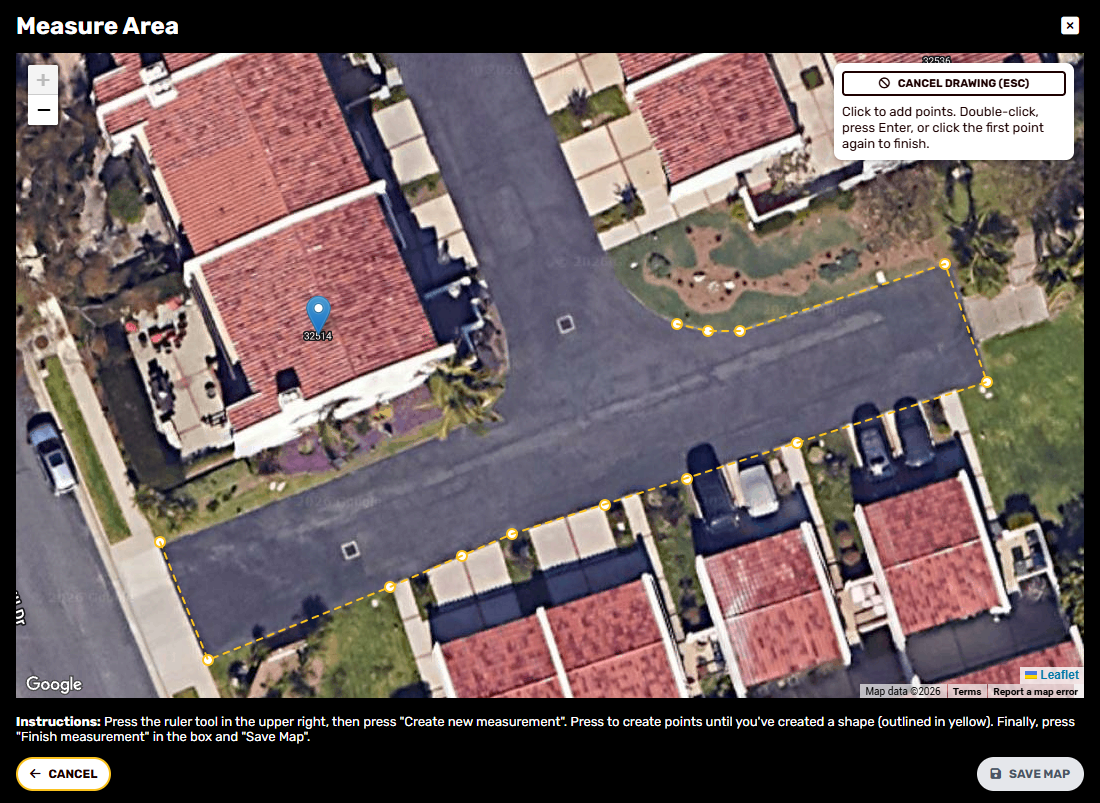
You can zoom in or out at anytime during the measuring process.
If the job includes multiple areas at the same address, you can select the Draw Area option again and repeat the outlining process to measure each additional area before saving the map. Each outlined area will be calculated separately, and the measurements will be combined into the total square footage.
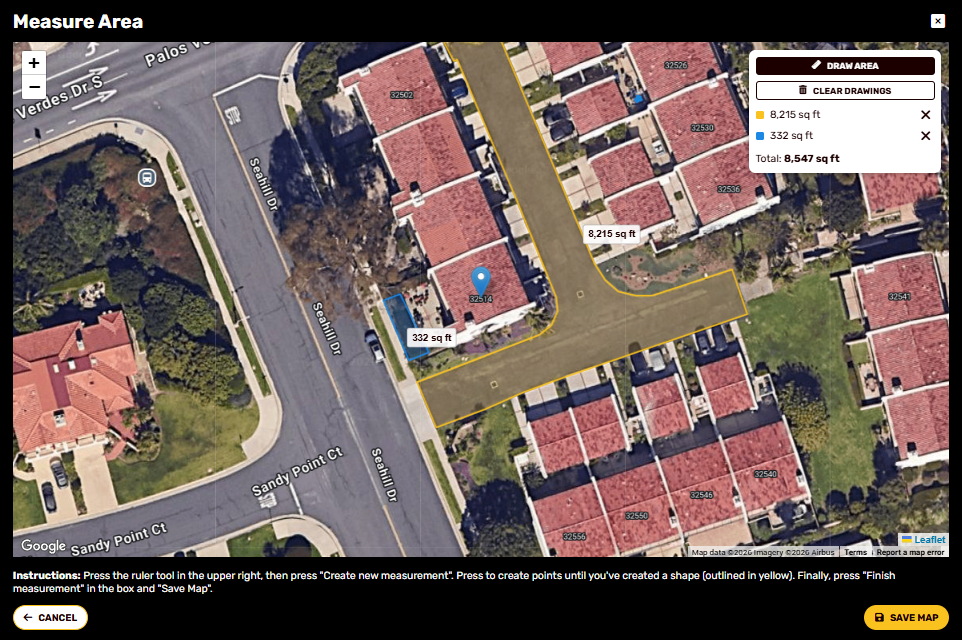
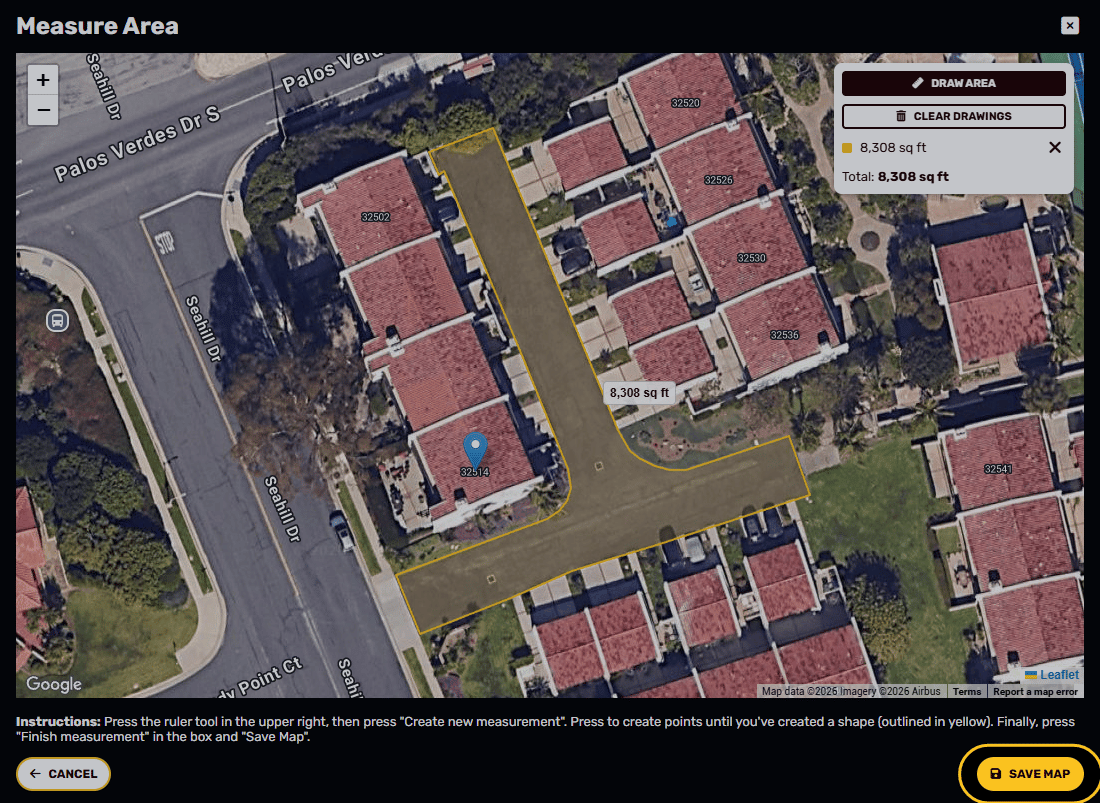
When the outline is complete, click Save Map.
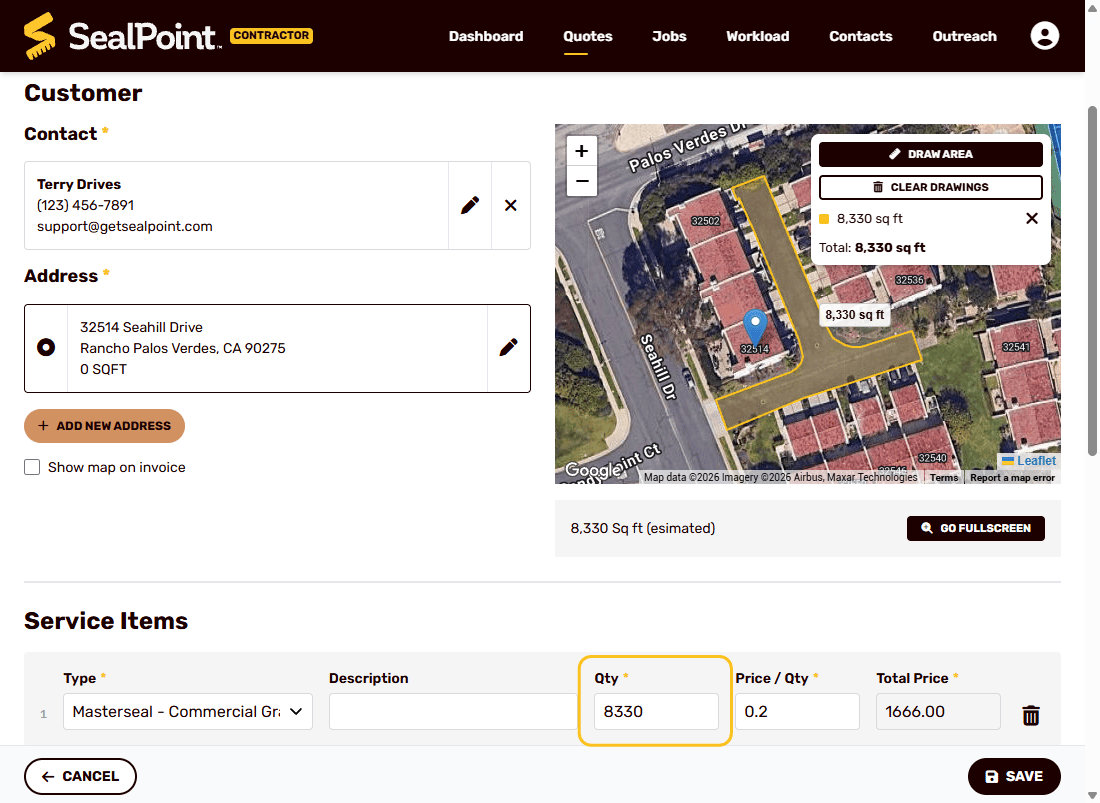
Use the estimated square footage as the Qty. For example, if the driveway measurement is 8,3330 square feet, you can enter ‘8,330’ in the Qty field for the service item.
Add any additional service items, include any customer-facing notes, internal team notes, or add before photos as needed.
When building a quote, you can choose whether the customer pays the payment processing fee or your organization absorbs the fee. This setting affects how the fee is displayed and calculated on the customer’s quote and invoice.
For more information on configuring this option, see Managing Pricing & Fee Settings help article.
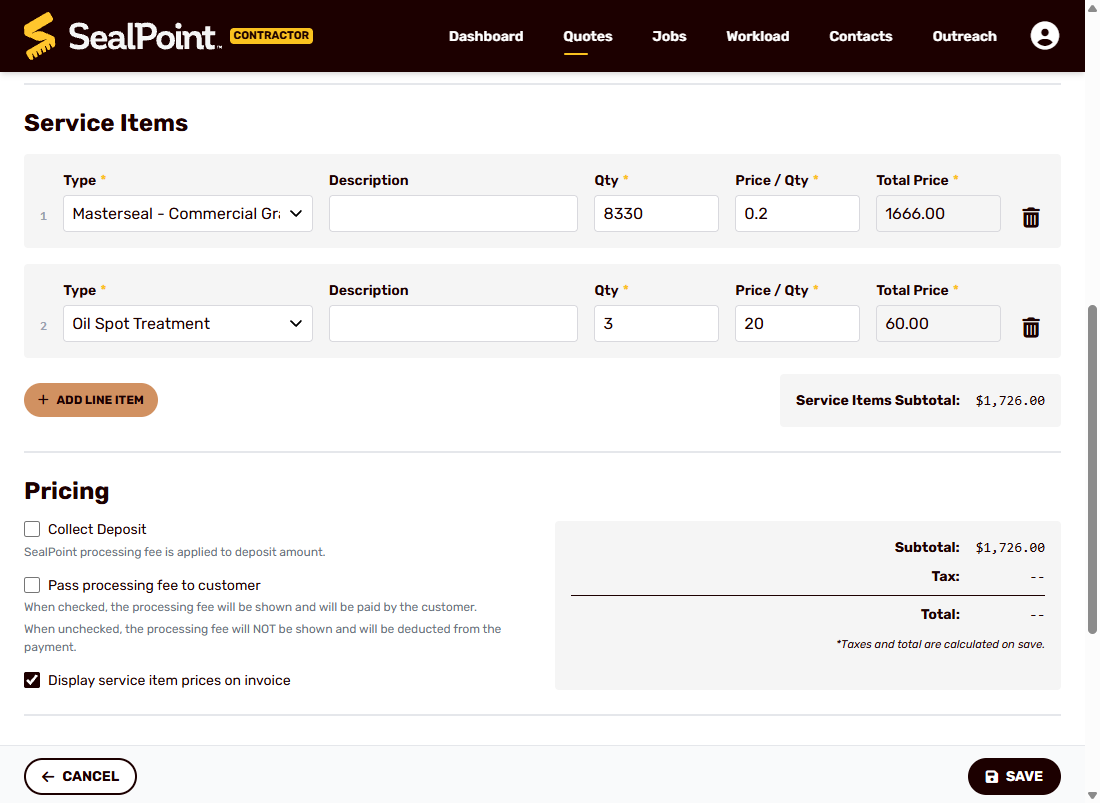
When you’re ready to send the quote, first choose Save, then select Send Quote. A preview of the quote will appear so you can review all details. If everything looks correct, click Send Quote to deliver it to the customer.
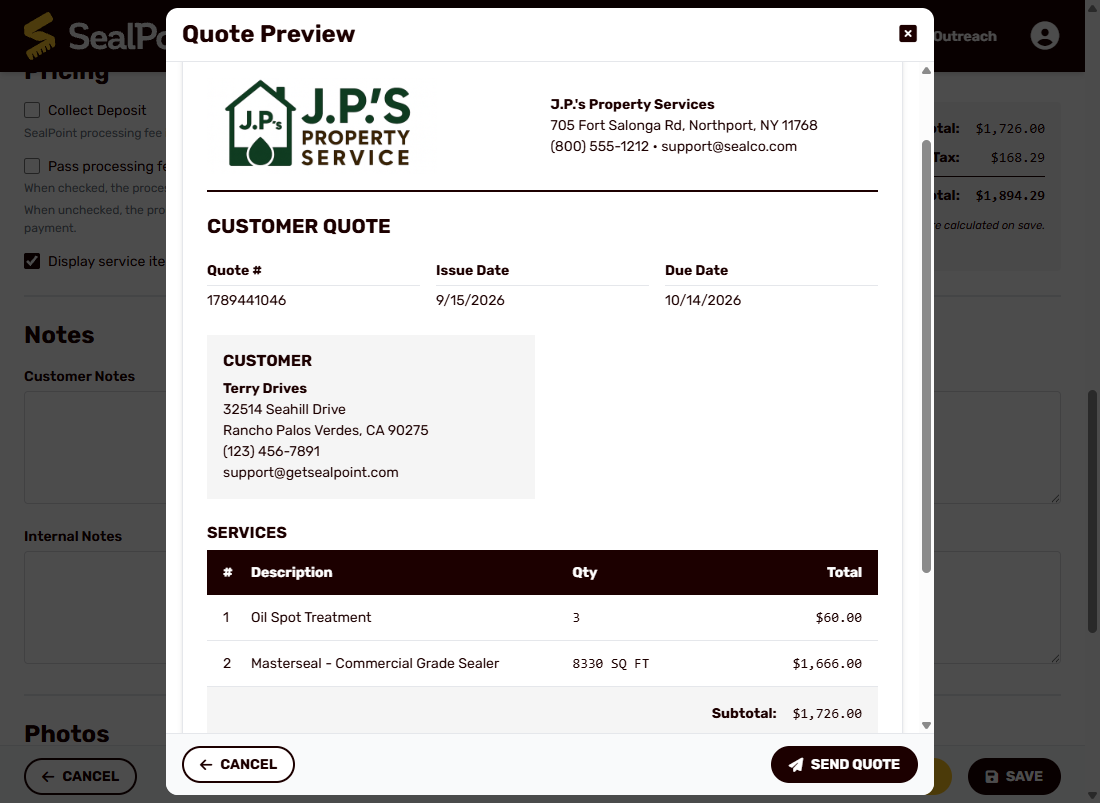
Once the quote is sent, the customer receives a link by email, text message, or both. From the link, they can open the quote and choose to either Approve or Decline it.
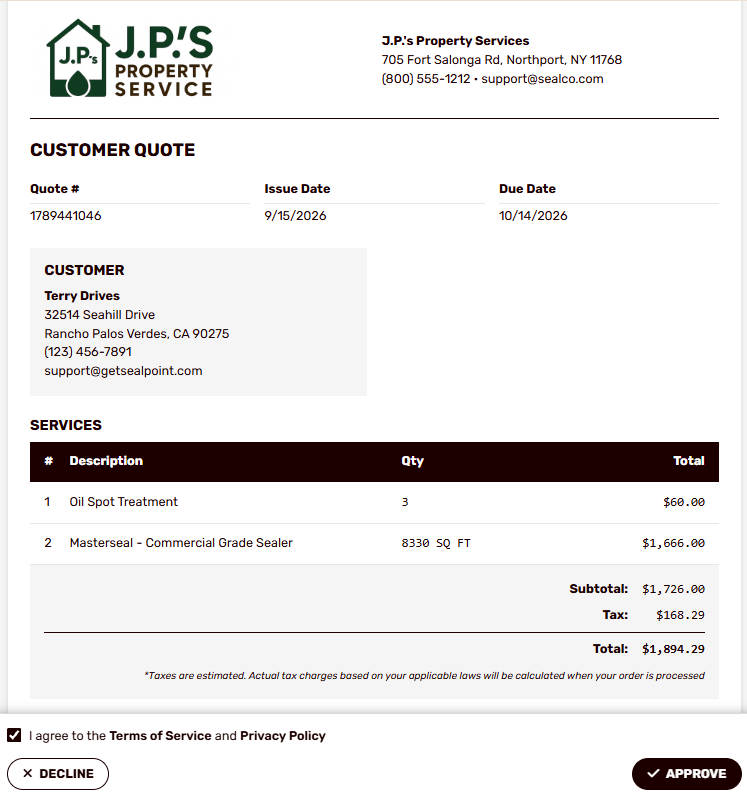
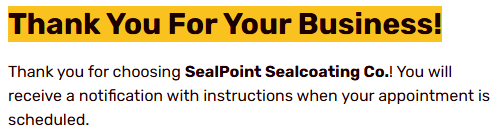
If the quote is approved, they will receive a confirmation message.
If needed, you can resend a quote at any time by opening the quote and selecting Send Quote from the Actions menu.
You also have the option to manually approve quotes on behalf of a customer. This allows the job to move forward without requiring the customer to complete the approval process.
To manually approve a quote on behalf of the customer, select the quote you want to approve, select the Actions button inside the quote, and choose Approve Quote.
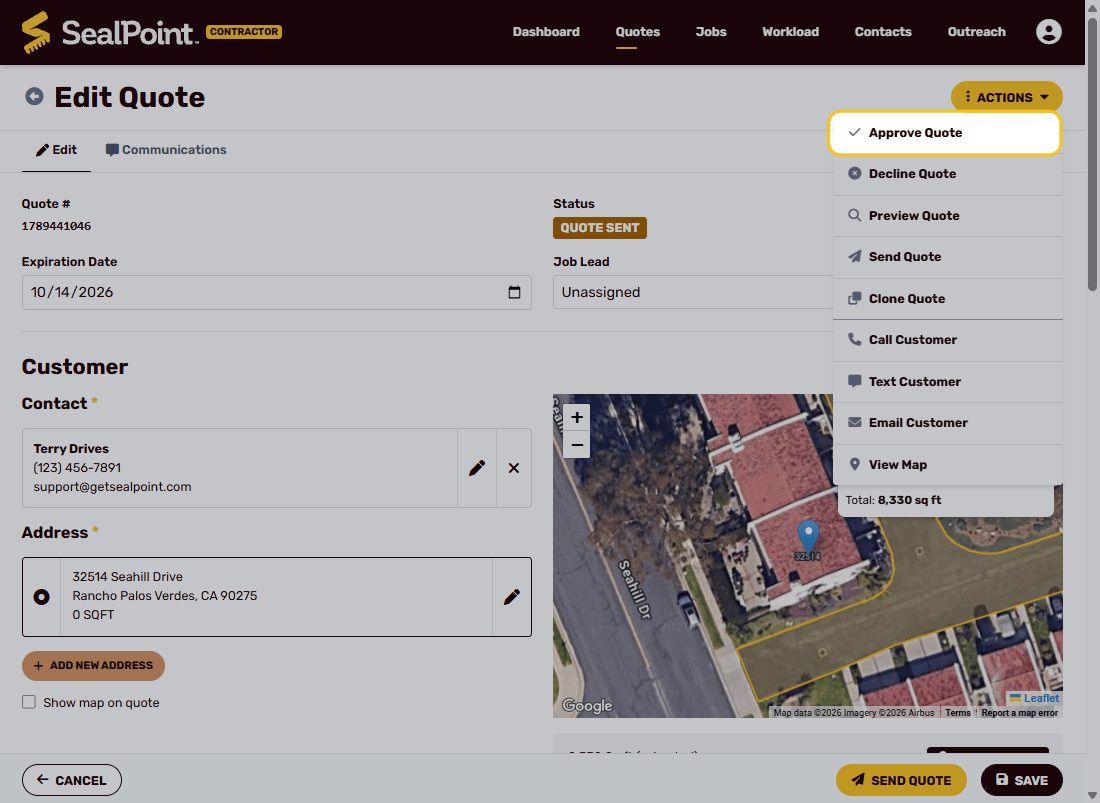
Once Approved, the status of the quote will change from Quote Sent to Customer Approved.
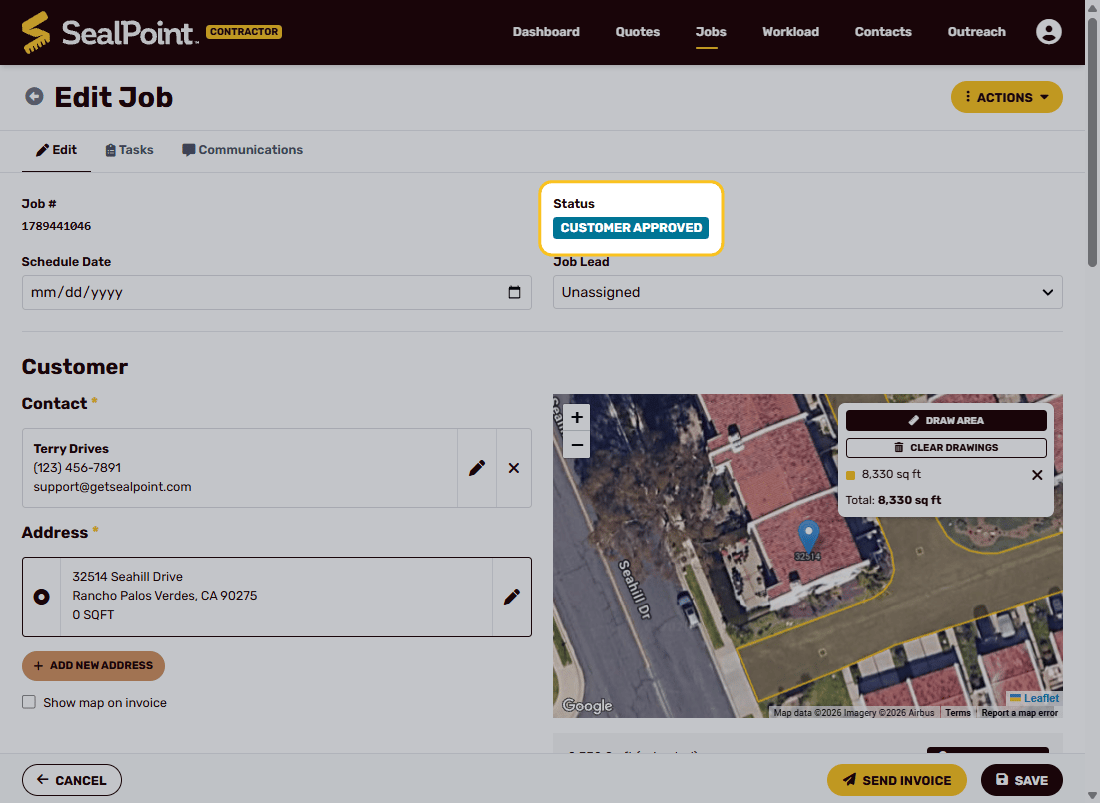
Now that the Quote is approved, it can be scheduled as a job.
Scheduling Jobs
All approved quotes automatically become available to schedule as jobs. From this point, you can assign a date and crew to complete the work, ensuring everything is organized and ready for your team.
From the top toolbar, click the Jobs tab to open the Jobs section. Here, you can view jobs of any status. To locate a specific job, use the search bar to look up by Job #, customer last name, company, or street address.
Jobs with a Customer Approved status are ready to be scheduled. To quickly find them, use the dropdown filter to display only Customer Approved jobs.
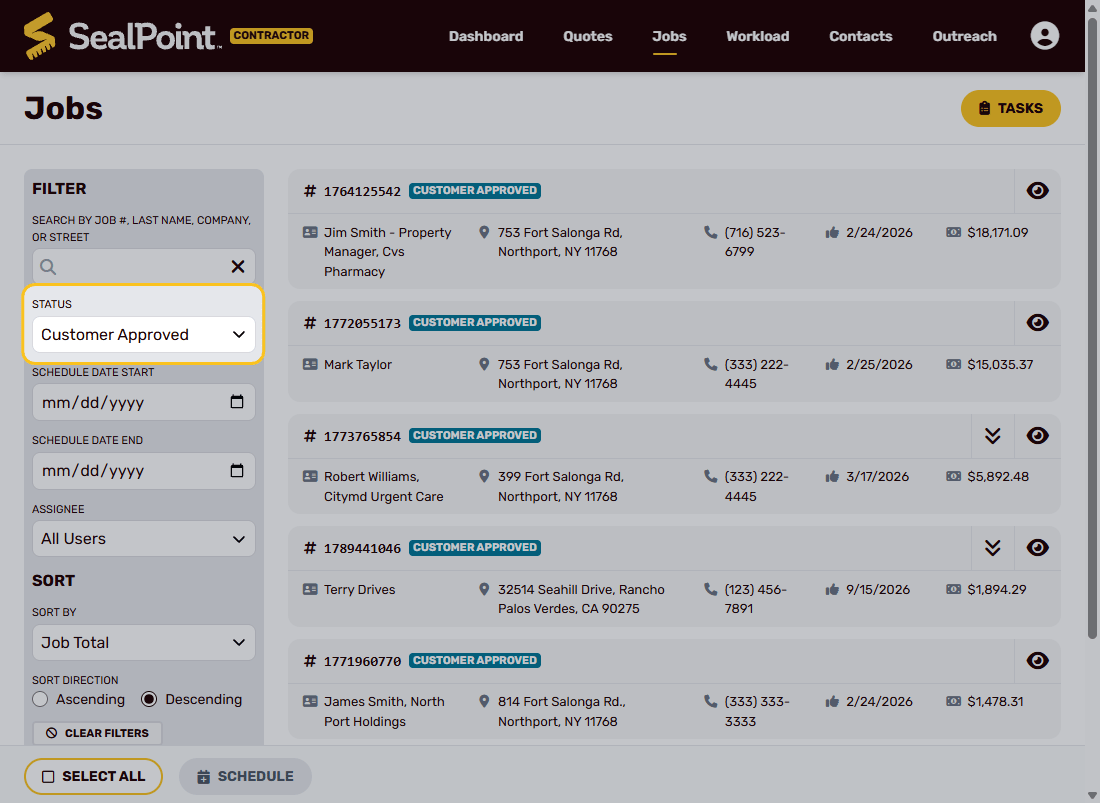
Each job is made up of one or more tasks. For many jobs, a single task represents the entire job. If the work needs to be completed across multiple days or broken into separate portions, the job can contain multiple tasks that can be scheduled independently.
To schedule work from the Jobs screen, select Tasks in the upper-right corner.
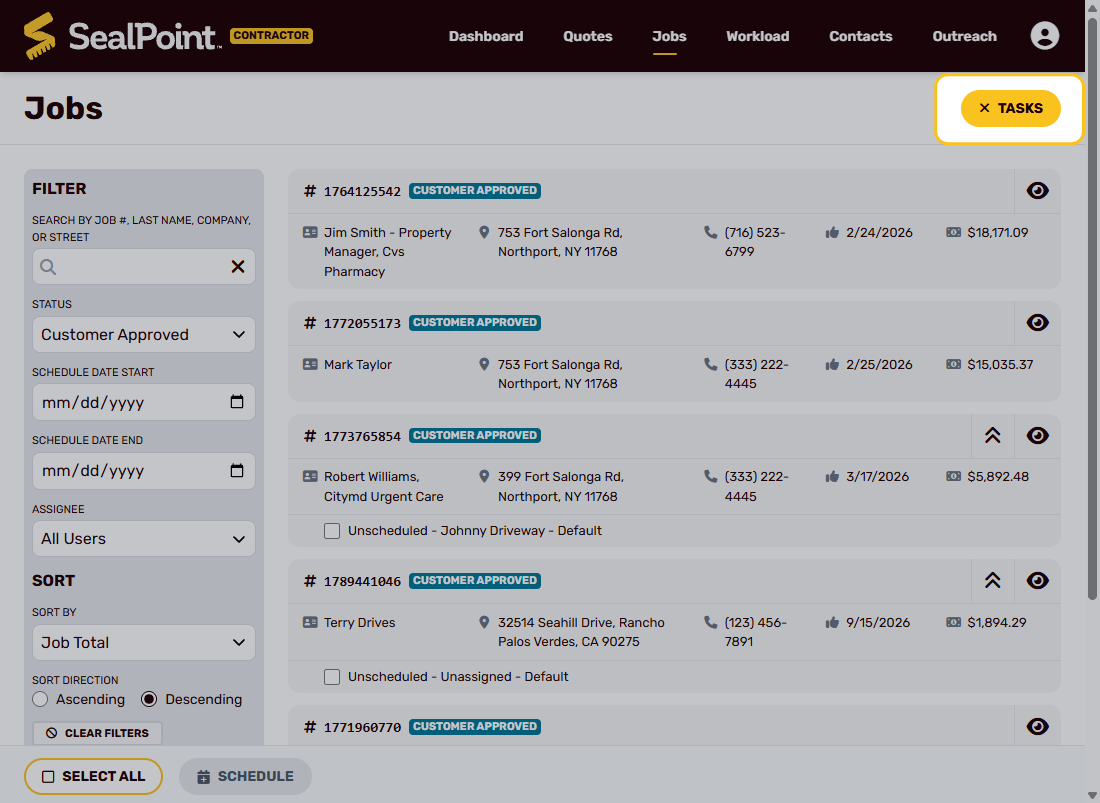
The task or tasks associated with each job will then appear beneath the job.
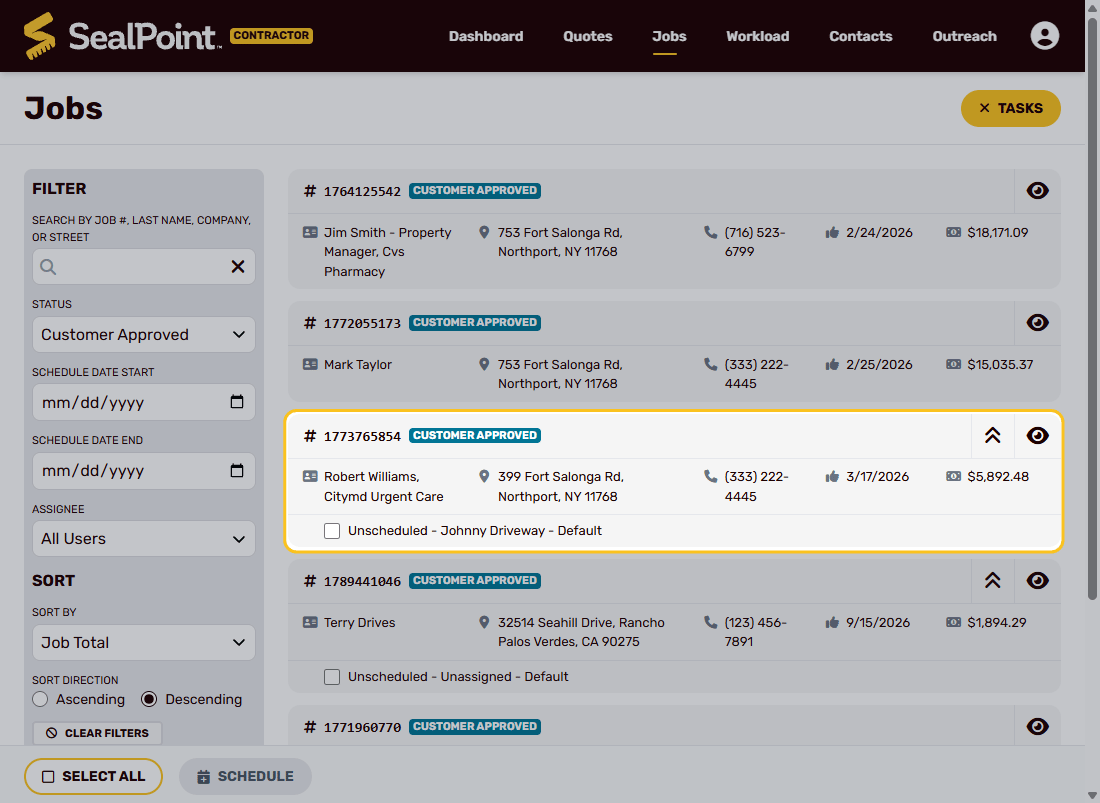
Select the task(s) you want to schedule by checking the box next to Unscheduled.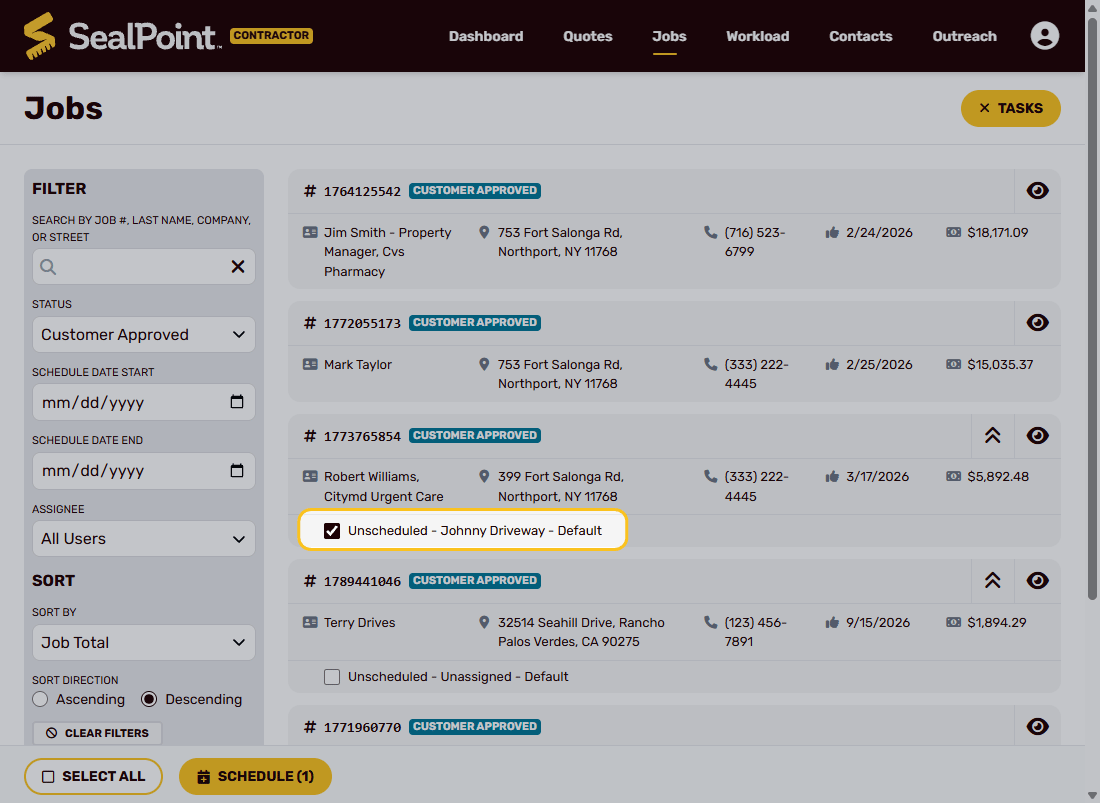 Then click Schedule to continue. You can select tasks from multiple jobs to schedule them in bulk. For jobs that only require one visit, the single task represents the entire job and can be scheduled as one unit.
When scheduling one or more tasks, choose the Schedule Date you’d like the work to be completed.
If you select multiple tasks and schedule them at the same time, all selected tasks will be assigned to the same date and crew member(s). If a job contains multiple tasks that need to be completed on different days or assigned to different crew members, schedule those tasks separately.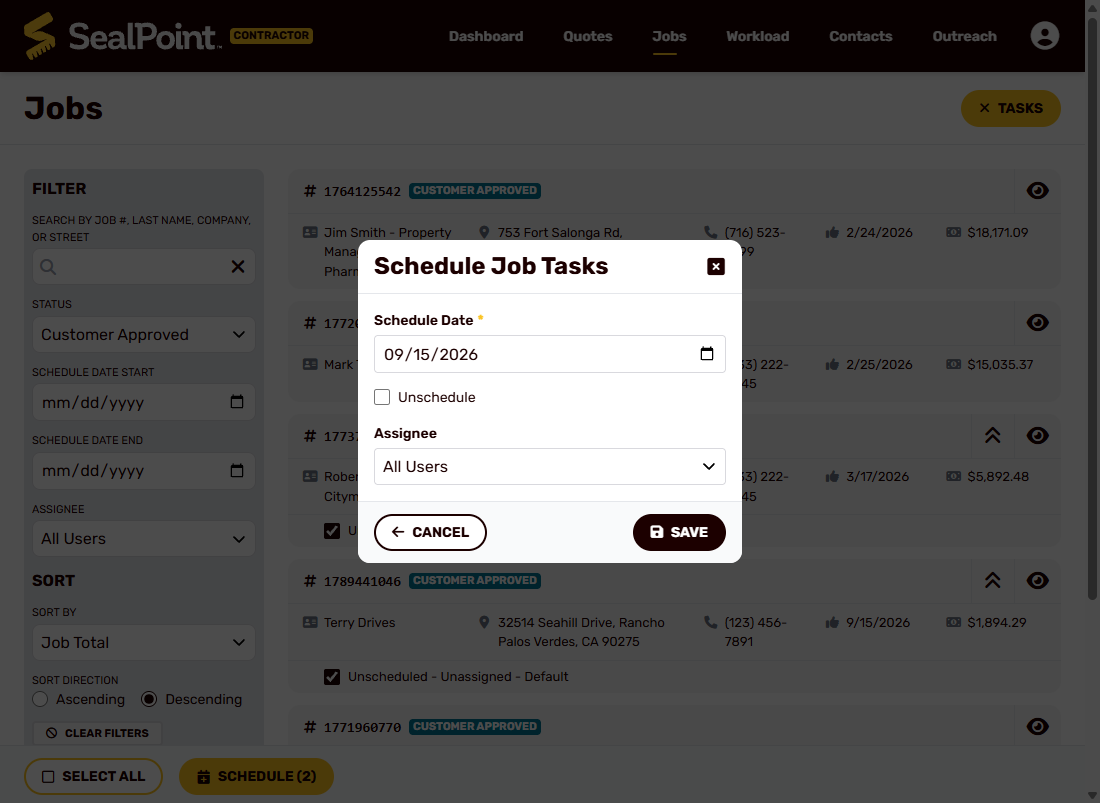
Next, select whether to assign the task(s) to All Users or to a specific crew member.
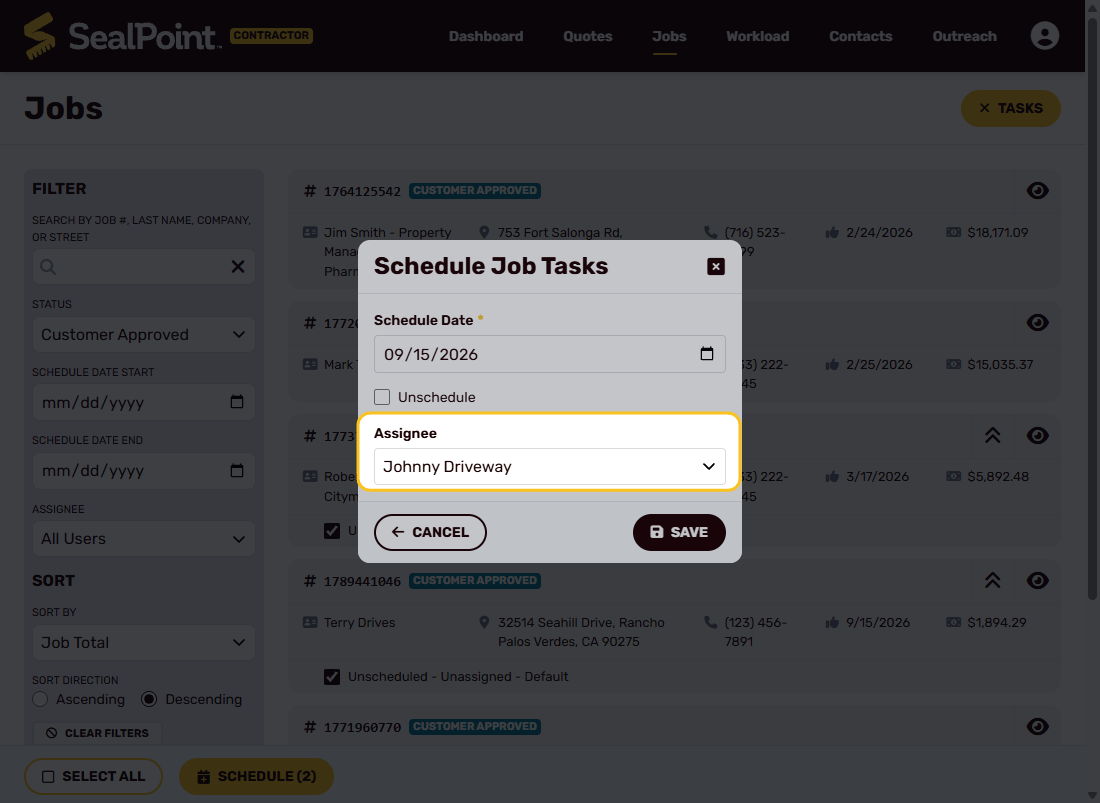 If you assign the task(s) to All Users, they will appear in every team member’s Workload. If you select a specific user, the task(s) will only appear in that individual’s Workload.
Once the date and crew assignment are selected, choose Save to complete the scheduling process.
When work is scheduled, SealPoint automatically sends the customer a confirmation email with their scheduled service date and day-of instructions. If the customer has opted in to job text messages, they will also receive a condensed SMS notification.
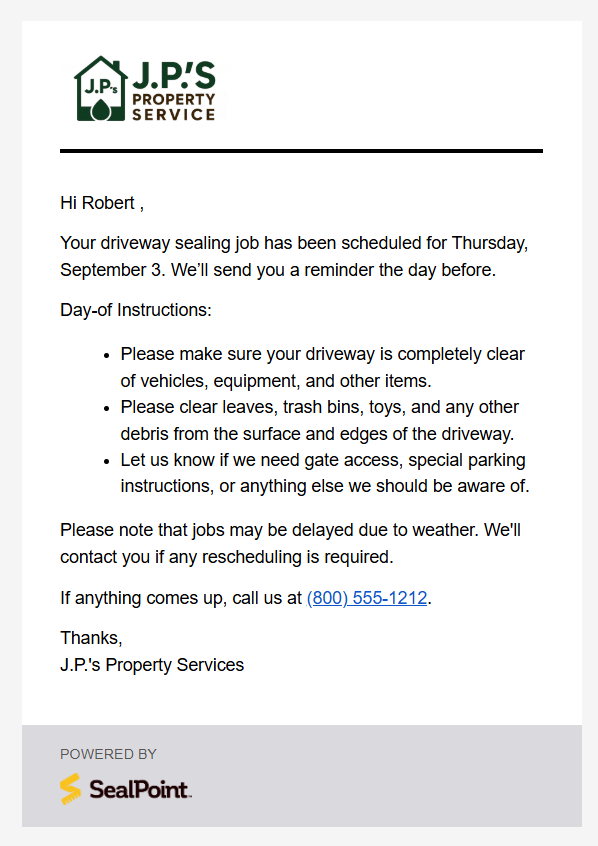
Customers also receive a reminder notification 24 hours before their scheduled service date. The reminder is only sent for work scheduled at least two days in advance. Same-day and next-day scheduling does not generate a reminder notification.
Workload
The Work Load gives you and your crew a clear view of the work scheduled for each day. Think of it as a digital work list that shows which tasks are scheduled, who they are assigned to, and the customer and job information needed to complete the work.
If a job has been divided into multiple tasks, each task will appear in the Work Load based on its scheduled date and assigned crew member.
Scheduled Jobs on the Dashboard
Upon login, the Dashboard includes a Scheduled Jobs section showing the work scheduled for the selected day. Job locations are plotted on a map, giving you a quick visual of how the day’s work is distributed across your area.
Alongside the map, you can view the customer and job information for each scheduled location and, depending on your device, call, text, or email the customer directly.
Viewing the Full Workload
You can access the full Work Load from the top toolbar. Use the Date and User filters to view scheduled work for a particular time period, across all users, or for an individual crew member.
The Work Load includes four different views:
The Work Load includes four different views:
- Day – Focus on the tasks scheduled for a specific day.
- Week – See scheduled work across an entire week and quickly understand how many jobs are lined up for each day. This view is especially helpful for reviewing upcoming workload and identifying busier or lighter days.
- Month – Get a broader overview of scheduled work across the month.
- Map – Plot scheduled jobs geographically to see where your crews will be working and how the jobs are distributed across your service area.
For day-to-day planning, the Week view provides a quick snapshot of the total work lined up for each day, making it easier to understand your crew’s upcoming workload at a glance.
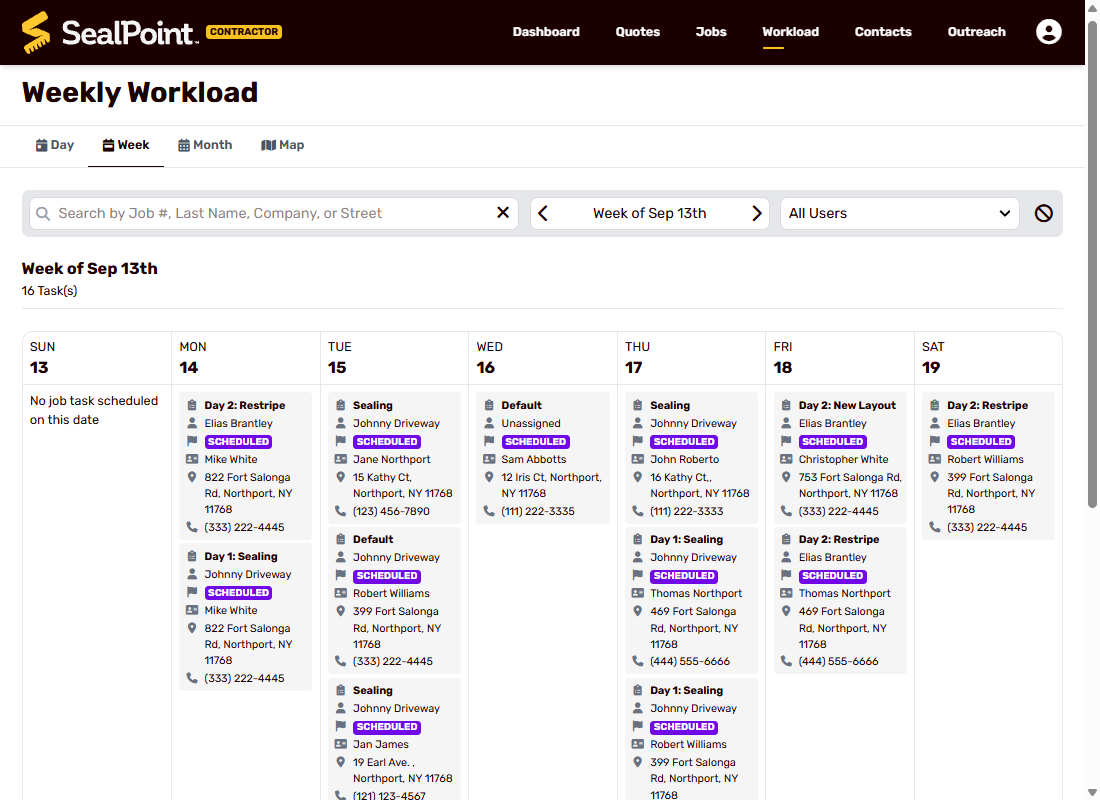
You can switch between views at any time depending on how you want to review your schedule.
Filtering by Crew Member
Use the User filter to view work assigned across the entire organization or narrow the Work Load to a specific crew member.
This can help you see how work is distributed between crew members and review an individual user’s schedule before assigning additional tasks.
By default, user permissions allow crew members to see only the work assigned directly to them. Organization administrators can grant additional permissions if a user needs access to all Contacts, Quotes, and Jobs within the organization.
Service Item Totals
The Work Load also provides a summary of the Service Item Totals included in the scheduled work for the selected date and user.
In the example below, the scheduled work includes 97,086 sq. ft. of SealMaster PMM – Premium Grade Sealer, 20 units of Oil Spot Treatment, 95 LF of New Layout, 112 units of Specialty – Numbers, Letters, Symbols, 3 sq. ft. of Premium Cold Patch, 20 LF of Hot-Pour, and 25 Parking Stalls.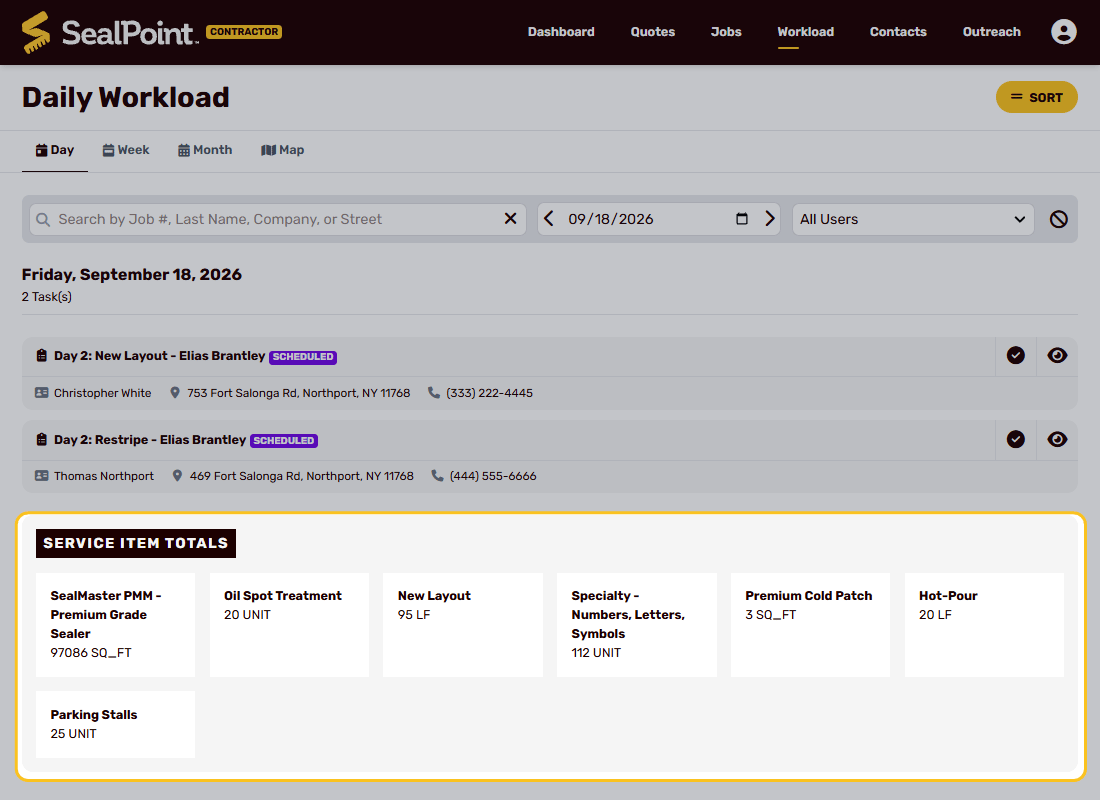
Service Item Totals give your crew a quick estimate of the materials and services needed for the selected work, making it easier to plan and prepare before heading out for the day.
Completing Jobs, Invoicing, & Payment
Once the work is performed, SealPoint gives you two ways to close out the job depending on how the customer is paying.
If payment is still due, you can Send Invoice and provide the customer with a secure online payment link. If you have already collected payment outside of SealPoint, such as cash or check, you can use Record Payment instead.
On The Way Notification
On the scheduled service date, you can let the customer know your crew is on the way directly from the job.
Open the job, select Actions → On the Way.
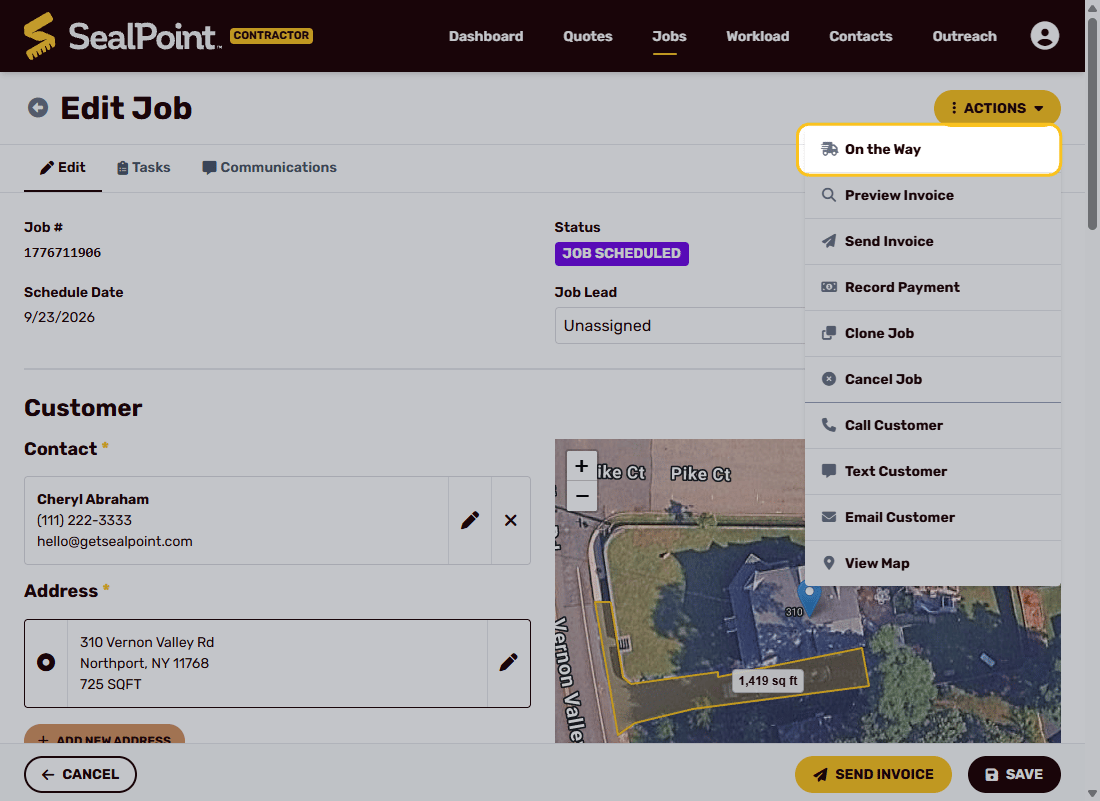
Choose the estimated arrival time; 15 minutes, 30 minutes, or 1 hour
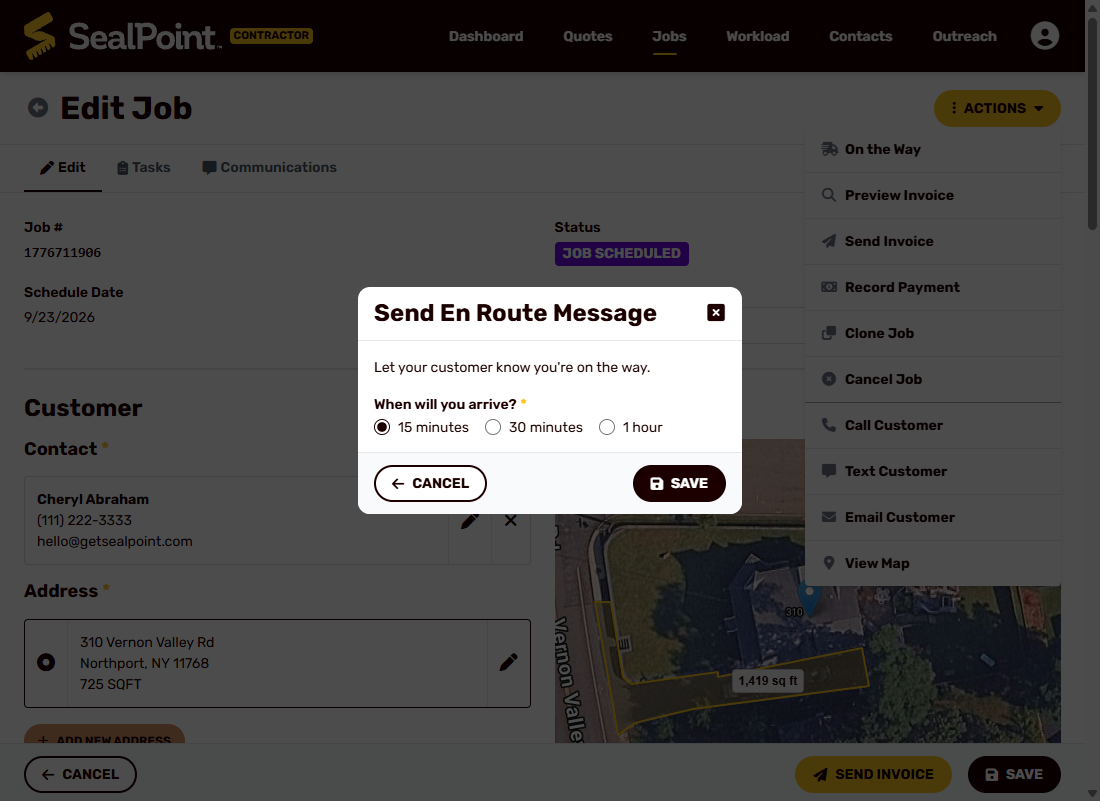
Then select Save.
SealPoint will send the customer an On the Way email or text message notification with the selected estimated arrival time.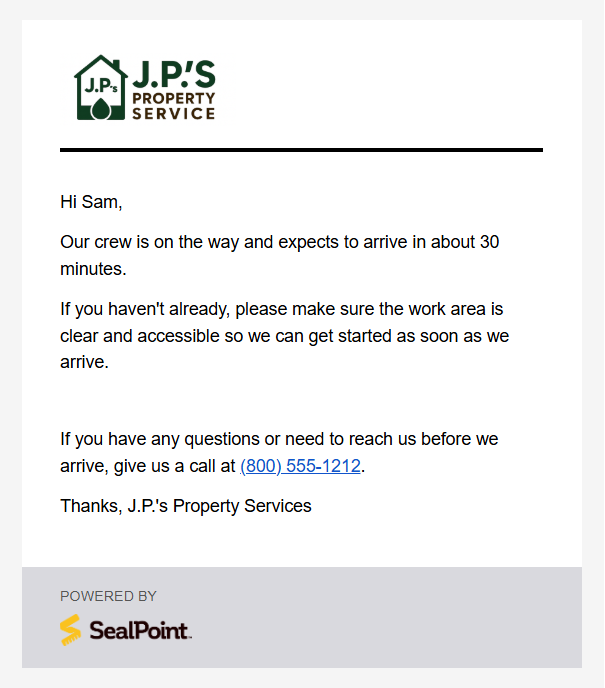
Text Message Sent:
[Business Name] will arrive in about XX minutes. Please make sure the work area is accessible. Questions? Call [Business Phone Number].
Note: The On the Way option is only available on the day the job is scheduled.
Sending an Invoice
If the customer still needs to pay after the work is completed, open the job and select Send Invoice.
The Send Invoice option is available from the Actions menu or from the bottom-right corner of the job.
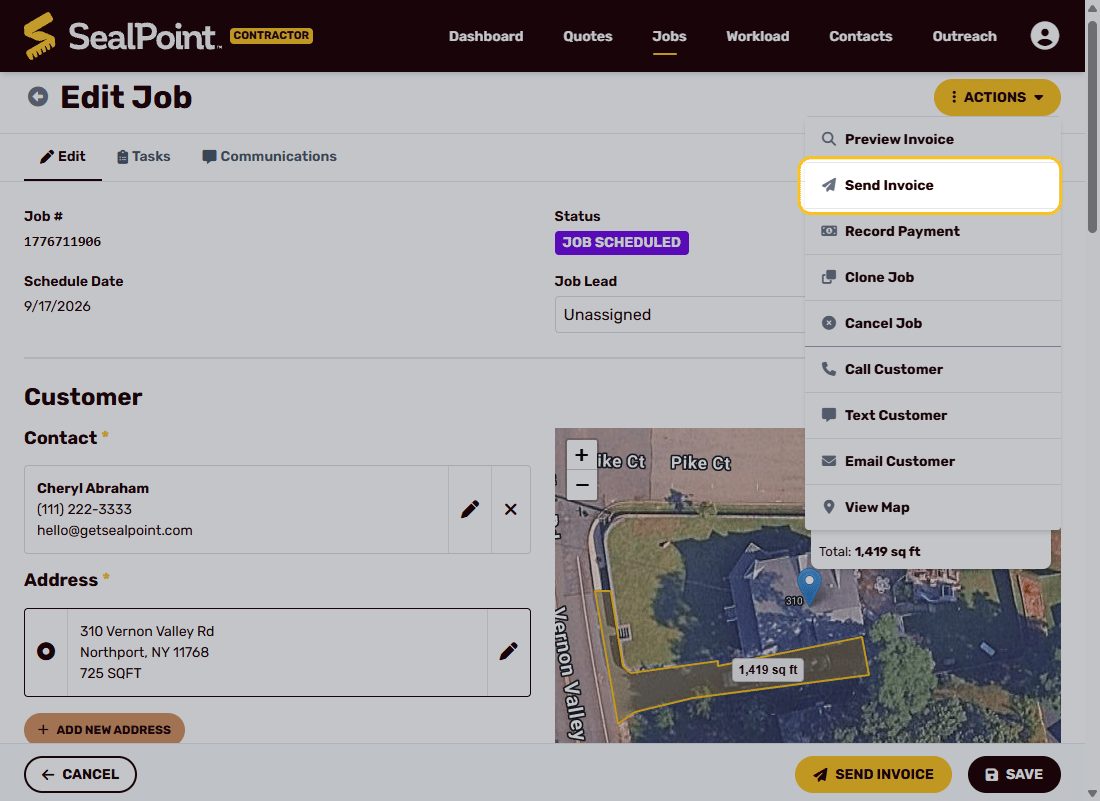
Like sending a quote, you will receive a preview of the invoice before it is sent. Review the service items, pricing, taxes, notes, and other details before selecting Send Invoice.
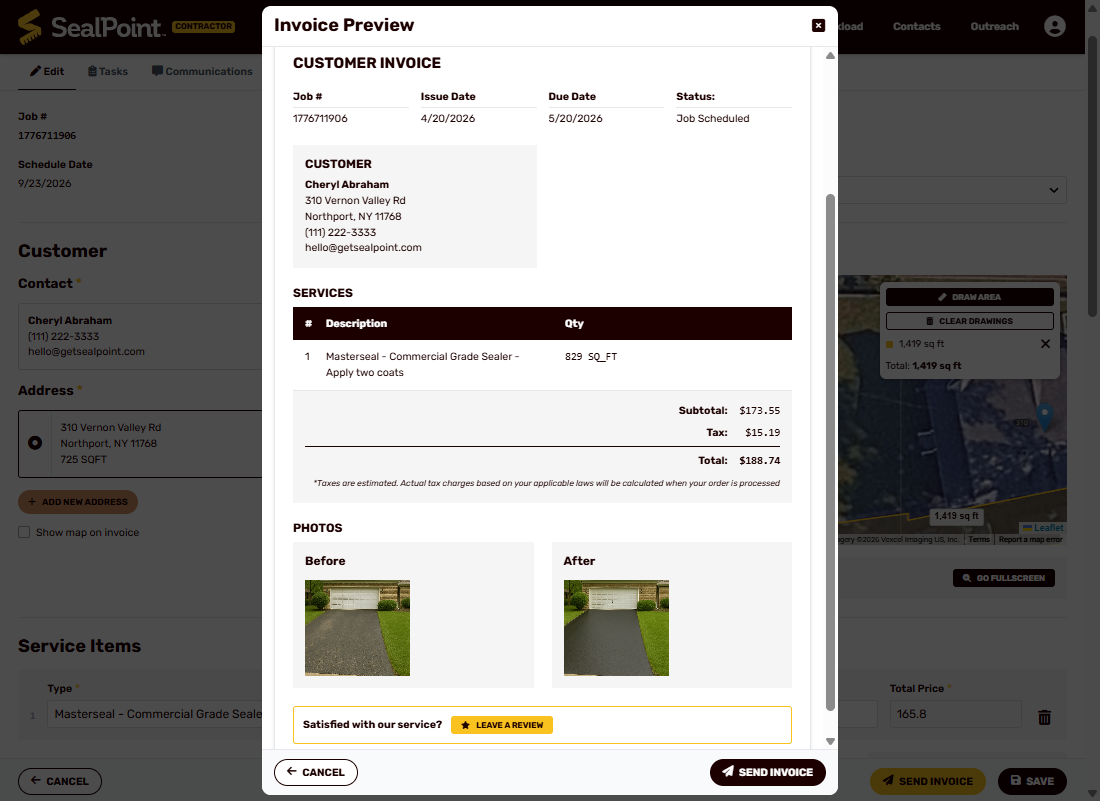
The customer will receive a secure link to view and pay their invoice by email and, if they have opted in to job text messages, by SMS. 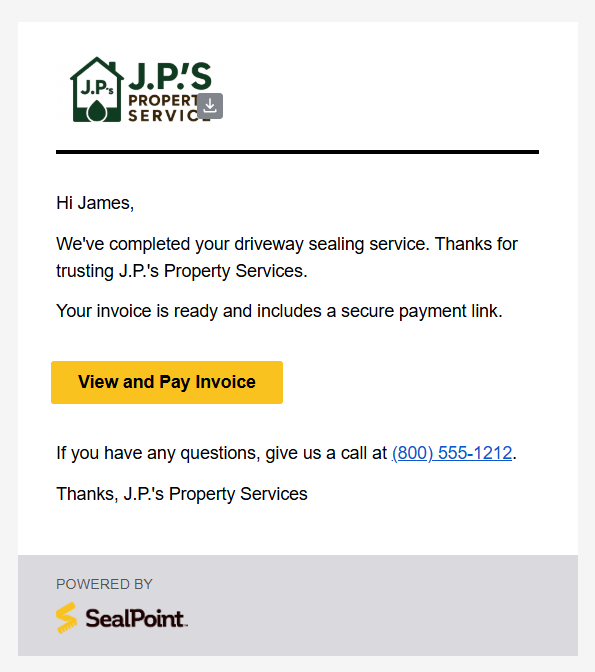
Text Message Sent:
We finished the job! Thanks for choosing [Business Name]! Your invoice is ready. View/pay: [Invoice Link] Call [Business Name] if you have questions.
The customer will see the same invoice details shown in the preview, including the service items, pricing, taxes, fees, and notes. From there, they can select the secure payment option to pay the invoice online. The invoice link is sent by email and, if the customer has opted in to job text messages, by SMS.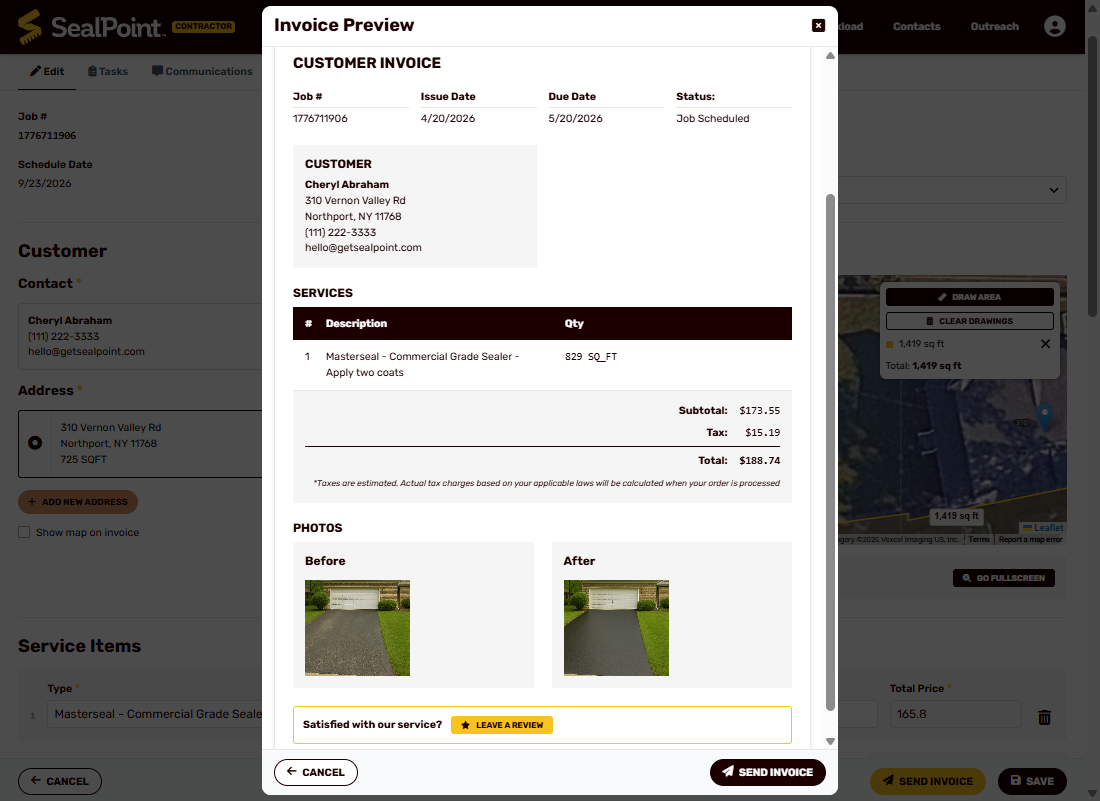
Customers can use the secure payment link to pay by credit or debit card, Apple Pay, Google Pay, Cash App Pay, Link, Affirm, or Klarna, depending on the payment options available to them.
Payments are processed through Stripe and deposited into your connected bank account. The payment method selected by the customer does not change how your payout is delivered—once the payment is processed, funds follow the normal payout and bank deposit timeline for your account.
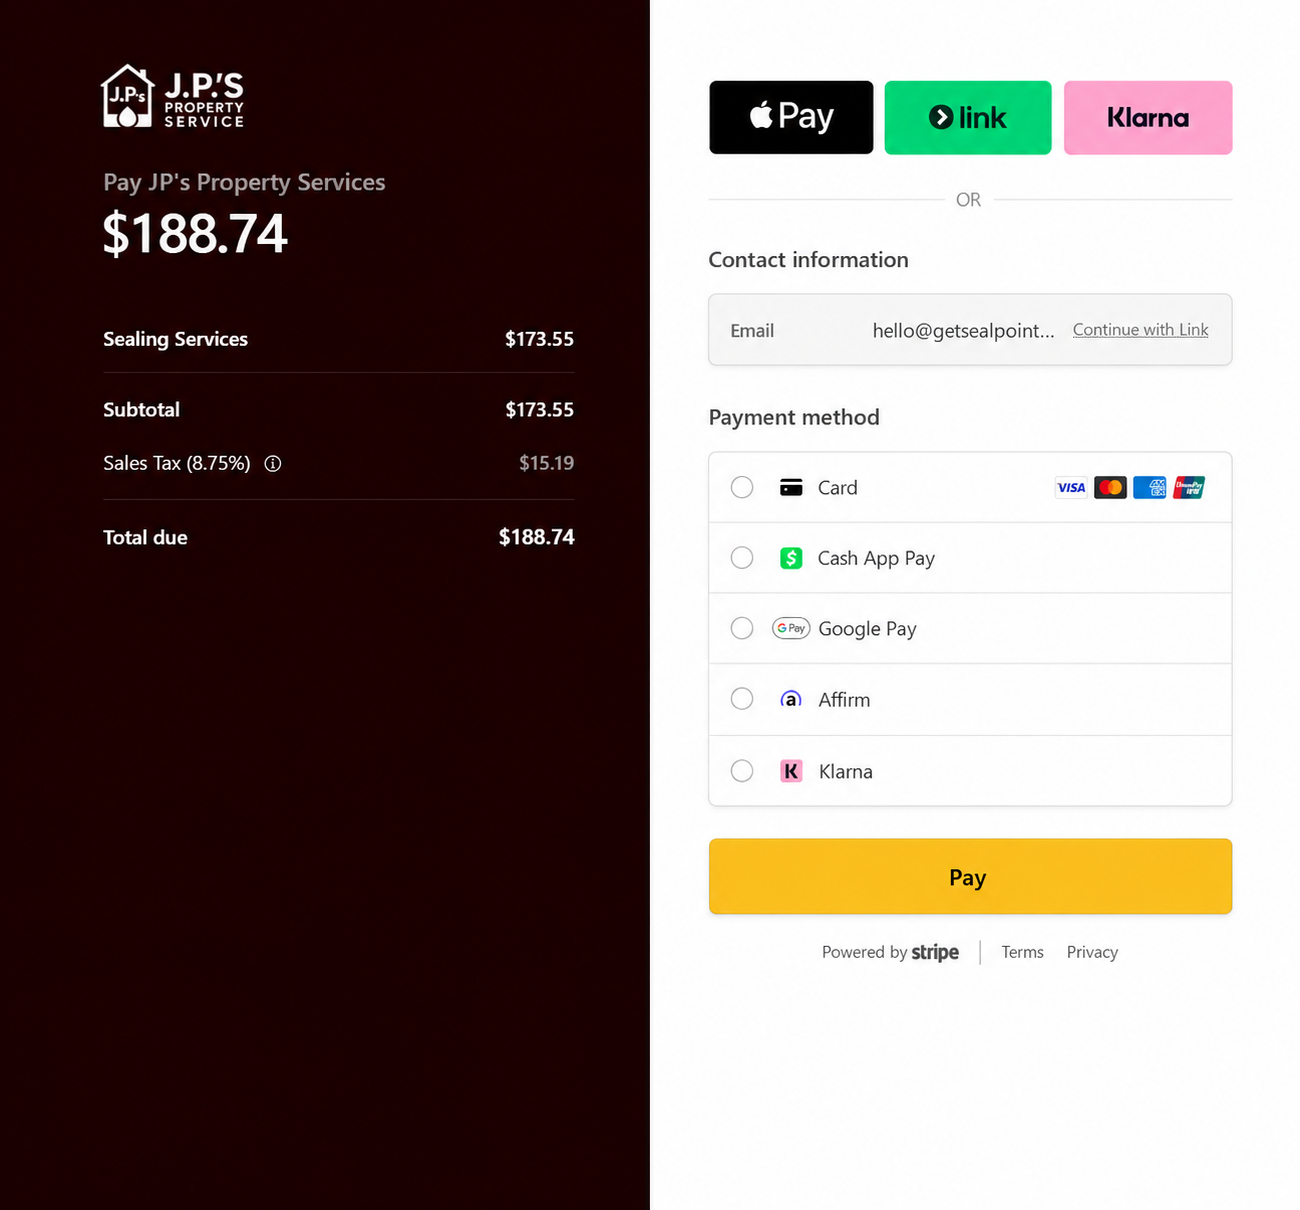
Once payment is complete, the invoice status will automatically update in SealPoint and the customer will receive a link to their receipt.
If the invoice remains unpaid, SealPoint will continue sending the customer a daily payment reminder.
Recording a Payment Received Outside SealPoint
If you have already collected payment outside of SealPoint, such as cash or check, you can record the payment directly on the job without first sending an invoice.
Open the job and select Actions → Record Payment.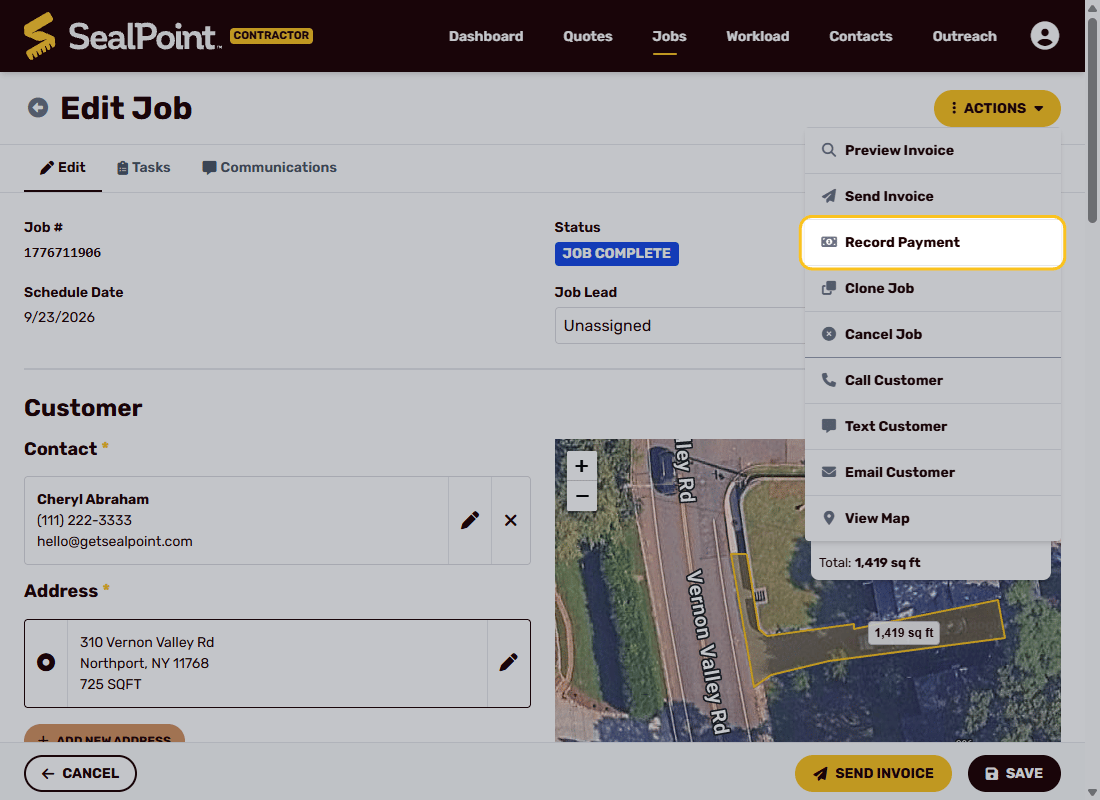
Choose the type of payment you are recording:
- Remaining Balance – Records payment of the outstanding balance and updates the job status to Paid.
- Deposit – Records a deposit payment but does not change the job status.
Enter the Amount Collected (including tax) and select Save.
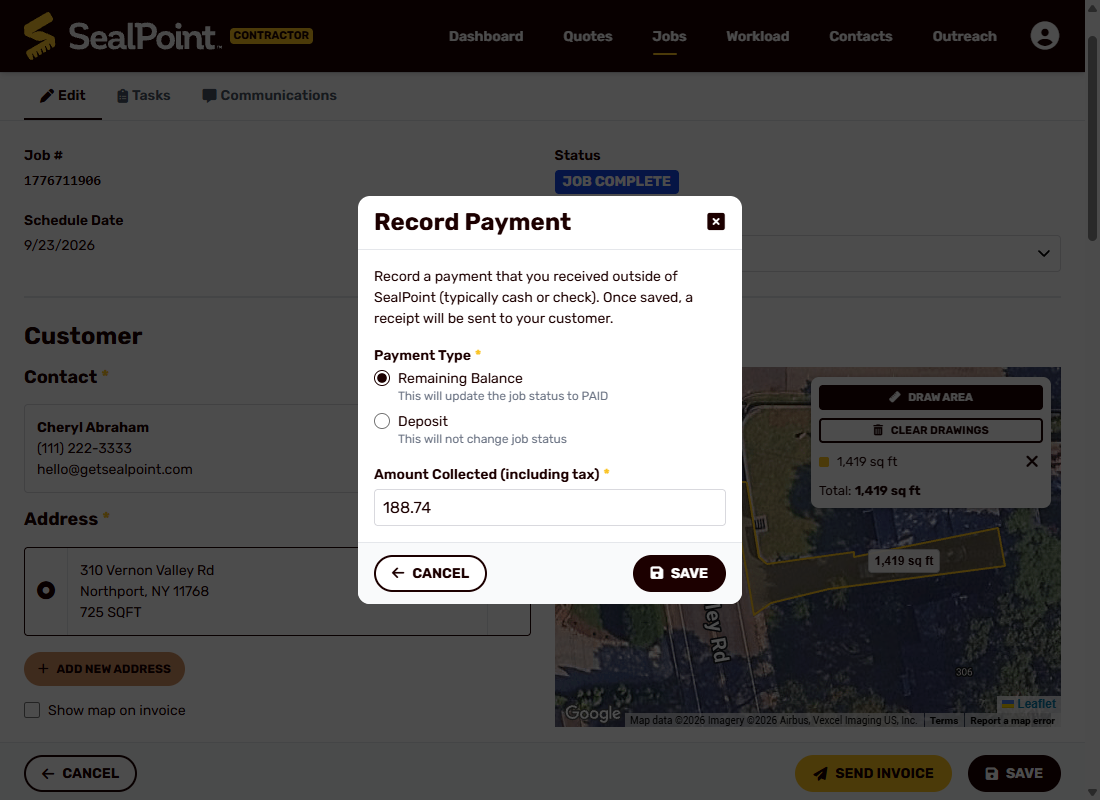
Once the payment is recorded, SealPoint will save the payment against the job and send the customer a receipt.
This option is especially useful when a customer pays you directly and no online payment is needed.
Summary
SealPoint helps you manage your workflow from the initial quote through job completion and payment:
- Dashboard: Get a quick view of business performance, upcoming workload, and scheduled work.
- Creating & Sending Quotes: Add customers, measure properties using satellite imagery, build quotes with your service items, and send them directly to customers for approval.
- Scheduling Jobs: Turn approved quotes into jobs, schedule individual tasks, assign work to your crew, and automatically keep customers informed.
- Work Load: View scheduled work by day, week, month, or map, filter by crew member, and use Service Item Totals to help prepare for upcoming jobs.
- Completing Jobs & Payments: Keep customers updated when your crew is on the way, send invoices for secure online payment, or record payments received outside of SealPoint.
Together, these tools provide one connected workflow for managing customers, quotes, scheduled work, your crew, invoices, and payments from start to finish.
Was this article helpful?
That’s Great!
Thank you for your feedback
Sorry! We couldn't be helpful
Thank you for your feedback
Feedback sent
We appreciate your effort and will try to fix the article